

By setting up the Shopgate plugin, you benefit from numerous features that are transferred directly to your app:
| Supported version | Import to Shopware | ||
|
6.4 and later |
Orders | ✔ | |
| Customer account | Export to Shopgate | ||
| Login with desktop shop account | ✔ | Products | ✔ |
|
Login with mobile account |
✔ | Categories | ✔ |
| Customer groups/tier pricing | ✔ / ✔ | Reviews | ✔ |
| Show desktop order history on mobile | ✔ | ||
| Sync | Live cart validation | ||
| Delivery status "shipped" | ✔ | Coupon | ✔ |
| Order status "canceled" | ✔ | Shipping methods | ✔ |
| Stock quantity (product detail page) | ✘ | Payment methods | ✔ |
| Product availability | ✔ | ||
| Supported payment methods | Notes | ||
| No payment mappings are currently provided. | Web checkout | ✔ |
Important for existing customers: Please contact us at least four weeks before any switch to Shopware 6 so that we can review the migration of your app. This applies in particular to apps with existing custom adjustments or older contracts (before 2020).
Installing the plugin
The plugin is installed via Composer.
For the installation via Composer, please follow the instructions in the plugin's Readme.md on GitHub: https://github.com/shopgate/cart-integration-shopware6#install
Establishing the connection
After the Shopgate plugin has been installed successfully, these two steps are required:
- Enter your API credentials in your shop and your shop's URL in your Shopgate account.
- Connect your Shopgate app to your Shopware backend.
Getting your API credentials
- Log in to your Shopgate admin.
- Click Settings › Shop Interface.
- In the drop-down menu "Select system", search for Internal / own implementation and select it.
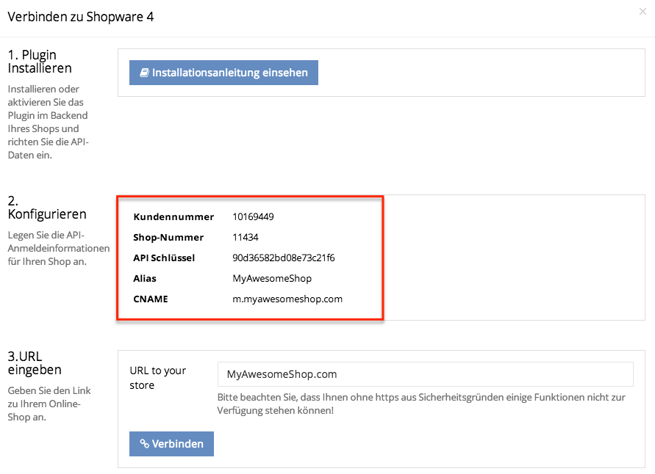
- In the pop-up window that opens, you'll find your Customer number, Shop number and API key. These are your API credentials, which are needed to activate the plugin for Shopgate. Keep this page open as well – you will enter your URL on this page later.
-
Now switch to the Shopware 6 backend and navigate to the installed Shopgate module under Extensions -> My extensions. Depending on the installation method used, the plugin may still need to be activated here. If so, activate it by setting the toggle to active.
Then navigate in the backend to Settings -> Extensions -> Shopgate API to configure the plugin for the connection. Click Add and select the desired sales channel and language, then copy the Customer number, Shop number and API key into the corresponding fields. Finally, set the toggle to active and save to apply the settings.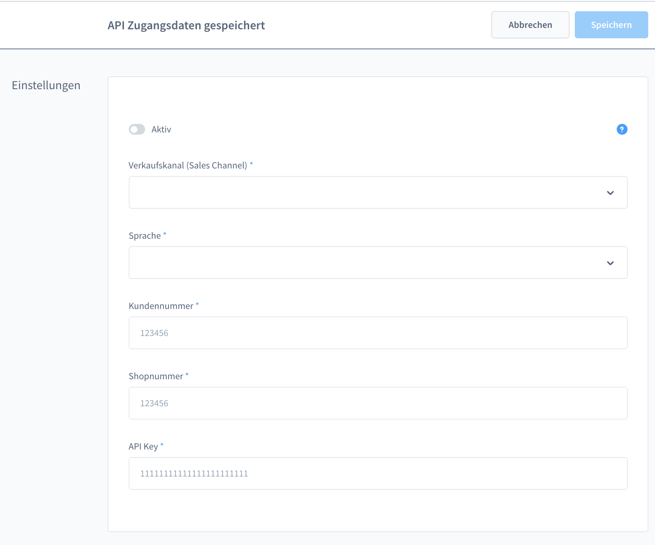
Connecting your shop to Shopgate
- Go back to the pop-up window in your Shopgate admin.
- Under "Enter URL", enter the URL of your online shop with the suffix /shopgate/plugin, e.g. https://www.MyAwesomeShop.com/shopgate/plugin. Then click Connect to set up the interface.
- As soon as the connection has been established successfully, another pop-up window opens. Here you can set up the jobs for the first connection. We recommend leaving these settings enabled (ON) for now. Finally, click Save to apply the settings.
That's it! Right afterwards, the import of your product data starts automatically via the Shopgate plugin.
Shopware 6 can also be connected live (beta). In that case, product data and product search come directly from your Shopware shop.
Configuring the plugin
The plugin's configuration page in detail.
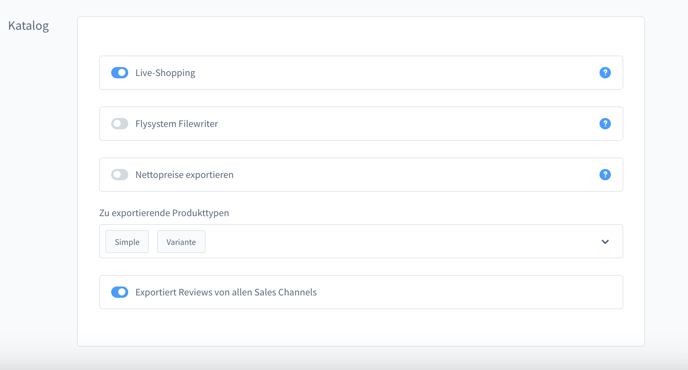
| Live-Shopping | Overrides product prices from the app in the cart and order to allow different product prices for Shopgate Live Shopping |
| Flysystem Filewriter | Less performant export alternative. Only enable if the server does not allow write operations. |
| Export net prices | Only enable if this sales channel should show net prices. |
| Product types to export | For configuring the product types that should be exported to Shopgate. |
| Export reviews from all sales channels | If enabled, product reviews from all sales channels are exported, not just those from the selected one. |
| Ignore sorting in categories | If enabled, products are transferred to Shopgate unsorted. This can improve export performance if the sorting can be handled in another way. |
Troubleshooting
Not all products are shown in my categories
From plugin version 3.3.0, an index for the product<>category assignment is created to improve export performance. After updates, it may be necessary to generate this index manually once. You can easily trigger this in your Shopware admin under "Settings > System > Caches & indexes > Update indexes". Then please clear the cache in Shopware (on the same page). The issue should be fixed with the next import.