| Available for the following platforms: | |||
| Shopgate Connect | ✔ | Shopgate Go | ✔ |

Shopgate supports Oxid as a shopping cart system.
By setting up the Shopgate plugin for your Oxid shop, you will get these features straight into your apps and mobile website:
| Supported Version | Import to Oxid | ||
|
4.2 + |
Orders | ✔ | |
| Sync | Export to Shopgate Mobile Shop | ||
|
Delivery Status "Shipped" |
✔ ✔ ✔ |
Products Categories Reviews |
✔ ✔ ✔ |
| Customer Account | Validate, upon Cart Changes | ||
|
Login with Desktop Shop Account |
✔
✔ |
Coupon Shipping Method Payment Method Product Availability |
✔ ✔ ✔ ✔ |
| Supported Payments | Notes | ||
|
Shopgate |
The payment validation feature allows you to offer specific payment options to targeted carts and customers. The availability of this feature depends on your Oxid settings. To enable this feature, please contact Shopgate Support. |
||
In this article, you will find the instructions to set up the Shopgate plugin for your Oxid shop.
Install the Shopgate Plugin
Download the plugin
Download the latest plugin file "shopgate-oxid-integration.zip" via this link and extract the contents of the zip file. This should give you a folder called “oxid” with two subfolders:
- Ab_eShop_4.7 (this is for Oxid eShop version 4.7.0 and above)
- Bis_eShop_4.6 (this is for Oxid eShop versions 4.2.0 to 4.6.x)
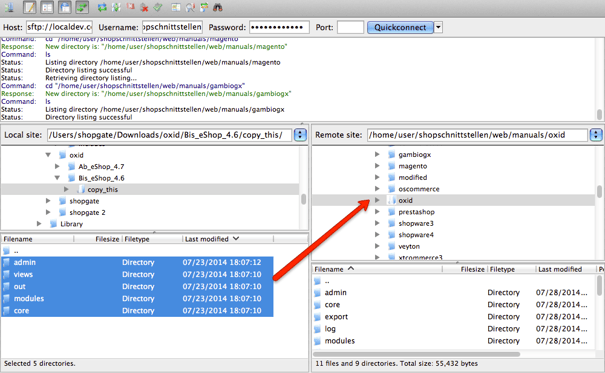
Upload the plugin to your server
- Use an FTP or a similar program to copy the plugin into your Oxid eShop. Plenty of FTP programs can be found on the internet. If you don’t know which one to use, we recommend FileZilla.
- Once your FTP program is connected to your server, navigate to your locally extracted Shopgate plugin.
- Choose between the subfolders “Ab_eShop_4.7” or “Bis_eShop_4.6” according to your Oxid version.
- Open a subfolder of this folder called “copy_this”. Copy all contents in "copy_this" directly to the root directory of your Oxid installation on your server. Don’t close your FTP program just yet. You’ll need it again in a later step.

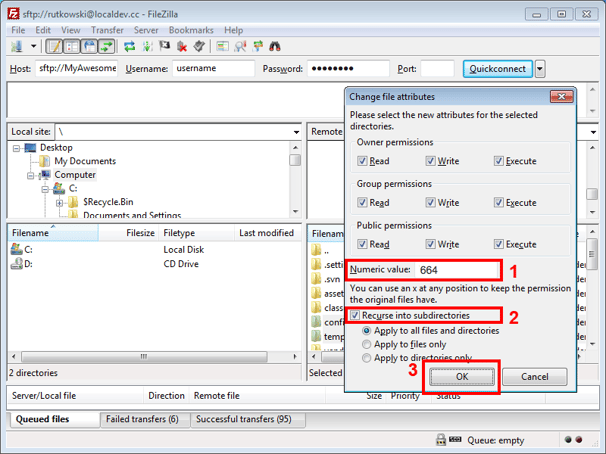
Set file permissions
It’s necessary to set file permissions to the "temp" and "config" folders on your server.
- To do this, navigate to the "modules/shopgate/shopgate_library" folder on your server and select both "temp" and "config" folders. Right click on your selection and click File permissions....


- "Change file attributes" opens. Enter the numeric value “664*” into the input field. Make sure the checkbox "Recurse into subdirectories” is enabled and “Apply to all files and directories” is selected as the option. Click OK to finish the upload.
* If you cannot save your changes or configurations, set file permissions to 777.

Now the plugin is successfully installed and ready to be activated.
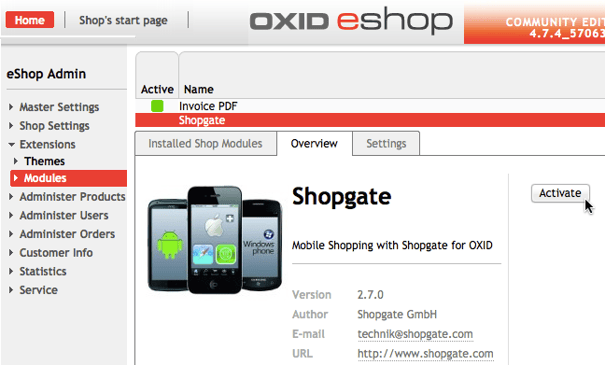
Activate the plugin
To activate the Shopgate plugin, log in to your Oxid admin backend and follow the instructions according to your Oxid version:
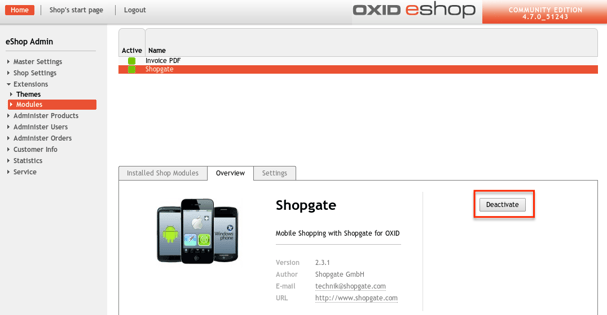
- Click Extensions -> Modules on the main menu on the left.
- Click Shopgate in the list of extensions.
- Click the Overview tab on the lower part of the screen, if it isn’t already open.
- Click the Activate button on the right to activate the Shopgate plugin.

- In the main menu on the left, click Master Settings -> Core Settings. Click the System tab. Click the Modules section to expand it.
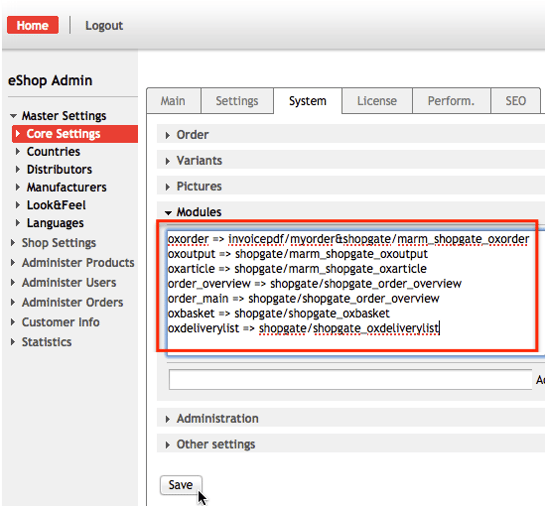

- Enter the following in the text area labeled Installed Shop Modules:
order_main => shopgate/shopgate_order_overview
order_overview => shopgate/shopgate_order_overview
oxarticle => shopgate/marm_shopgate_oxarticle
oxbasket => shopgate/shopgate_oxbasket
oxdeliverylist => shopgate/shopgate_oxdeliverylist
oxorder => shopgate/marm_shopgate_oxorder
oxoutput => shopgate/marm_shopgate_oxoutput
oxsession => shopgate/shopgate_oxsession
oxvarianthandler => shopgate/shopgate_oxvarianthandler - If some of the entries already exist, add the corresponding value to the end with an ampersand (&). For example: if "oxorder" (line 7) already exists like this:
oxorder => invoicepdf/myorder
add the info from "oxorder" to the end like this:oxorder => invoicepdf/myorder&shopgate/marm_shopgate_oxorder
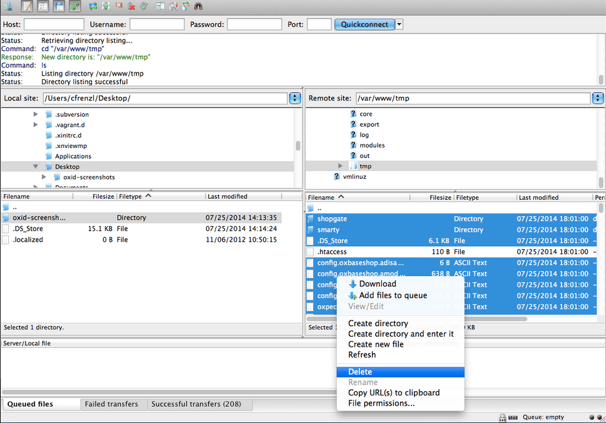
- Clear the temporary folder in Oxid before you proceed:
- Go back to your FTP program and locate a folder called "tmp" in your Oxid installation.
- If there is a file named ".htaccess", select all files except ".htaccess" inside the folder "tmp" and click Delete. Otherwise, delete all files inside the folder "tmp".


- Find the code section: Select Master Settings -> Core Settings from the menu on the left. Choose the System tab. Click Modules to expand the section.
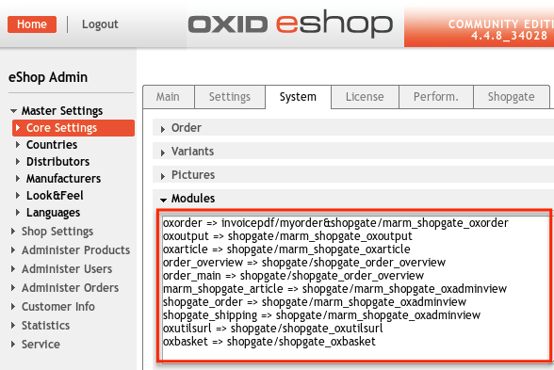

- Enter this code in the text area shown above:
marm_shopgate_article => shopgate/marm_shopgate_oxadminview
order_main => shopgate/shopgate_order_overview
order_overview => shopgate/shopgate_order_overview
oxarticle => shopgate/marm_shopgate_oxarticle
oxbasket => shopgate/shopgate_oxbasket
oxdeliverylist => shopgate/shopgate_oxdeliverylist
oxorder => shopgate/marm_shopgate_oxorder
oxoutput => shopgate/marm_shopgate_oxoutput
oxsession => shopgate/shopgate_oxsession
oxvarianthandler => shopgate/shopgate_oxvarianthandler
shopgate_order => shopgate/marm_shopgate_oxadminview
shopgate_payment => shopgate/marm_shopgate_oxadminview
shopgate_shipping => shopgate/marm_shopgate_oxadminview - If some of the entries already exist, add the corresponding value to the end with an ampersand (&). For example: if "oxorder" (line 7) already exists like this:
oxorder => invoicepdf/myorder
add the info from "oxorder" to the end like this:oxorder => invoicepdf/myorder&shopgate/marm_shopgate_oxorder
- Clear the temporary folder in Oxid before you proceed:
- Go back to your FTP program and locate a folder called "tmp" in your Oxid installation.
- If there is a file named ".htaccess", select all files except ".htaccess" inside the folder "tmp" and hit Delete. Otherwise, delete all files inside the folder "tmp".
Now you have activated your plugin. Continue to the next chapter.
Establish connections
After the Shopgate plugin has been installed successfully, two simple tasks need to be completed to connect your mobile shop at Shopgate to your shop's backend: first, enter API credentials in your shop's backend. Next, enter your shop's URL in your Shopgate's admin page.
Get API credentials
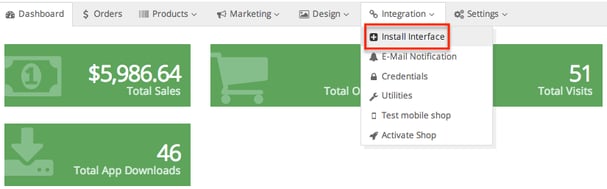
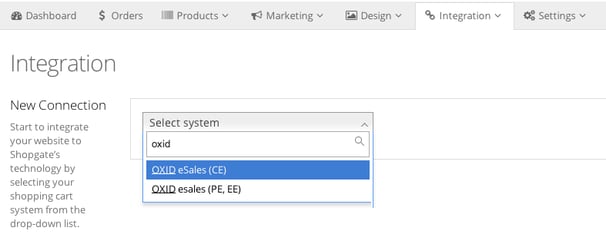
- Log into your Shopgate Admin page.
- Click Integration from the menu bar, then select Install Interface.
- In the dropdown labeled "Select system", search for "OXID eSales", and select a version depending on your shop edition. (CE = Community Edition, PE = Professional Edition, EE = Enterprise Edition)
- A pop-up opens. Under 2. Configure, you'll see the API credentials the plugin needs to authenticate with the Shopgate backend. Leave this page open for the next step 2.2 Establishing connection.

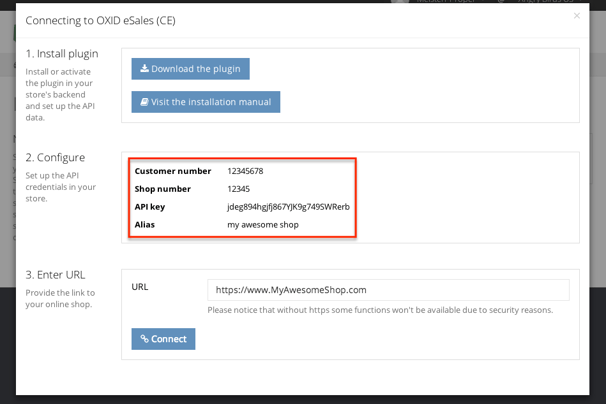
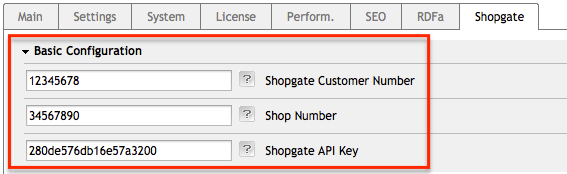
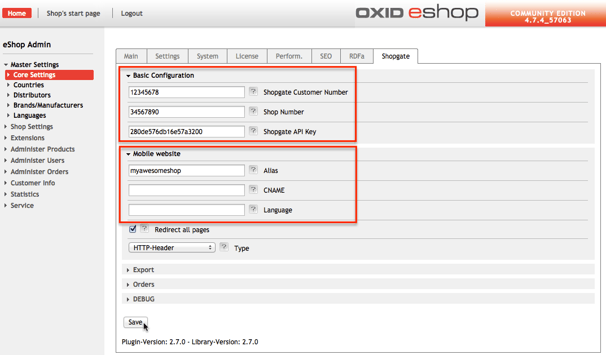
- Open your Oxid admin backend in another tab or window of your browser (if you don’t already have it open from installing the plugin). In the main menu on the left, click Master Settings -> Core Settings, then click the tab labeled Shopgate. Expand the sections called Basic Configuration and Mobile website by clicking them. Fill in the Shopgate Customer Number, Shop Number, Shopgate API Key, and Alias with the values from your Shopgate merchant backend. There are some other settings on this page, but you don’t need to configure them for now. Click Save.

Connect your shop to Shopgate
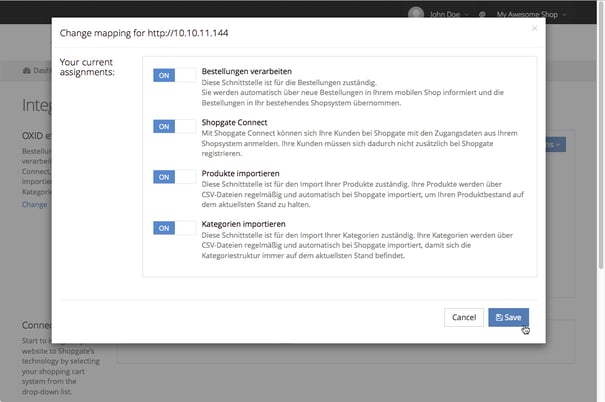
- Go back to the pop-up window at your Shopgate merchant page (step 4).
- Under 3. Enter URL, enter the URL of your shop. Click Connect to establish the interface.


- If a connection is made successfully, a pop-up shown below will open. Here you will be able to assign jobs for your first connection. Leave all assignments to ON to access all the available services. Click Save.
That's it! Now the Shopgate backend will automatically start to import product data via the newly established interface.
Update an existing plugin
Before updating your Shopgate plugin to a newer version, make sure to check if your shop uses a customized version of the Shopgate plugin. If this is the case, a generic plugin update will NOT work for your shop.
You are using a customized version if:
- You have contacted Shopgate about making a third party plugin to work in your mobile shop, or about adding a special feature or function.
- Shopgate has sent you an adapted version of the plugin.
- The plugin file you installed has "adaption" in the name.
Once you know if you are using a customized Shopgate plugin or not, follow the instructions below to update it:
- Deactivate the old plugin. In Oxid version 4.6 and later, you can do so by navigating to Extensions > Module > Shopgate > Overview and clicking the Deactivate button.
- Follow chapter 1 to install the latest plugin.


- Please email Shopgate with the following details each time before updating:
- To: support@shopgate.com
- Subject: Request an updated Shopgate plugin (custom adaption)
- Email body: Include your shop number and any additional info necessary. Where can I find my shop number?
- Deactivate the old plugin. In Oxid version 4.6 and later, you can do so by navigating to Extensions > Module > Shopgate > Overview and clicking the Deactivate button.
- Upload the customized Shopgate plugin (the one you received in the email) to your server.
- Set file permissions and activate the plugin.
That's it! Now you have successfully updated your Shopgate plugin.
Configure the Plugin
To find the setting for your Shopgate plugin, please click Master Settings -> Core Settings in the main menu on the left, then on the tab labeled Shopgate.
Configure your Shopgate credentials used to connect to the Shopgate system.
| Shopgate Customer Number | Your customer number at Shopgate. |
| Shopgate Shop Number | Your shop’s number at Shopgate. |
| Shopgate API Key | Your API key assigned by Shopgate. |
Set up your mobile website and redirect.
| Alias | The alias is the subdomain of shopgate.com, e.g. myshop.shopgate.com, where your mobile website can be found. This is used as a fallback if no CNAME is configured. |
| CNAME | A CNAME is a subdomain of your own domain that points to your mobile website. For example, a CNAME could look like "m.myshop.com". To configure a CNAME, please log on to your server hosting website. |
| Language | A comma-separated list of ISO 639-1 (e.g. en, de, fr) that should be redirected to your mobile website. Leave this blank to redirect all languages. |
| Type | Redirect users via HTTP-Header if possible - it’s fastest and best for search engines. If you experience trouble using HTTP-Header redirect, try JavaScript. |
Frequently Asked Questions
A "system health check" notice appeared after I installed the Shopgate plugin. What should I do?
As shown in the graphics below, the collations of some fields are incorrect.


To fix this, please navigate to Service > Tools to execute the following SQL commands.
- For systems that work with ISO:
ALTER TABLE `oxordershopgate` CHANGE `OXID` `OXID` CHAR( 32 ) CHARACTER SET latin1 COLLATE latin1_general_ci NOT NULL;
ALTER TABLE `oxordershopgate` CHANGE `OXORDERID` `OXORDERID` CHAR( 32 ) CHARACTER SET latin1 COLLATE latin1_general_ci NOT NULL;
ALTER TABLE `oxordershopgate` CHANGE `order_number` `order_number` VARCHAR( 20 ) CHARACTER SET latin1 COLLATE latin1_general_ci NOT NULL; - For systems that work with UTF-8:
ALTER TABLE `oxordershopgate` CHANGE `OXID` `OXID` CHAR( 32 ) CHARACTER SET utf8 COLLATE utf8_general_ci NOT NULL;
ALTER TABLE `oxordershopgate` CHANGE `OXORDERID` `OXORDERID` CHAR( 32 ) CHARACTER SET utf8 COLLATE utf8_general_ci NOT NULL;
ALTER TABLE `oxordershopgate` CHANGE `order_number` `order_number` VARCHAR( 20 ) CHARACTER SET utf8 COLLATE utf8_general_ci NOT NULL;
How do I know if my OXID system works with UTF-8 or ISO?
Navigate to Service > Systeminfo. You should find a table that contains iUtfMode.
In the column on the right side of the page, you can see the number 0 or 1.
- If you see the number 1 in this column, your system works with UTF-8.
- If you see the number 0 in this column, your system works with ISO.
I have multiple shops under my Oxid Enterprise account. Can I create a mobile shop for each shop individually?
Yes, of course! You are able to create separate mobile shops and apps for each shop under your account.
To do so, go to your Oxid backend, select a shop, then enter your Shopgate credentials as shown below.