| Available for the following platforms: | |||
| Shopgate Connect | ✔ | Shopgate Go | ✔ |
Shopgate supports Shopware (version 5) as a shopping cart system.
![]()
By setting up the Shopgate plugin for your Shopware (version 5) shop, you will get these features straight into your mobile shop and apps:
| Supported Version | Import to PrestaShop | ||
| Shopware 5.2 | Orders | ✔ | |
| Sync | Export to Shopgate Mobile Shop | ||
| Delivery Status "Shipped" Order Status "Canceled" Stock Quantity on Product Detail Page Product Tax Classes, Rates, & Rules |
✔ ✔ ✔ ✔ |
Products Categories Reviews Related Products, Upsell, & Cross-sell |
✔ ✔ ✔ ✔ |
| Customer Account | Validate, upon Cart Changes | ||
| Login with Desktop Shop Account Login to Desktop Shop with Mobile Account Customer Groups/Tier Pricing Show Desktop Orders on Mobile |
✔ ✔ ✔ / ✔ ✔ |
Coupon* Shipping Method Payment Method** Product Availability |
✔ ✔ ✔ ✔ |
| Supported Payments | Notes | ||
|
Shopgate |
Up-sell products and DHL module supported. Product and brand searches done in a search engine on a mobile device are now redirected to the shop's mobile website. * Shopgate coupons will NOT work when the DHL module is used. Regular shop coupons are not affected and will continue to work on the desktop and the mobile sites. ** The payment validation feature allows you to offer specific payment options to targeted carts and customers. The availability of this feature depends on your PrestaShop settings. |
||
Install the Shopgate Extension
Installing the Shopgate extension for your Shopware shop is fast and easy using these steps. However, if you would rather install using a zip file, please refer to our Frequently Asked Questions section at the bottom of this article.
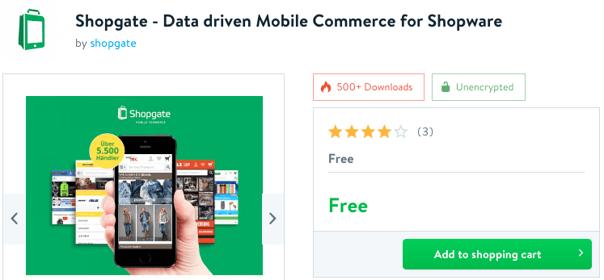
- Simply go here and get the Shopgate extension by clicking Add to shopping cart. This extension is completely free for Shopgate users.
- Finish the checkout process. Log in with your Shopware ID and password if you are not logged in yet.
- Install the extension by following the instructions.
That's it! Now the Shopgate extension has been installed in your Shopware shop.

Establish the connections
After the Shopgate plugin has been installed successfully, two simple tasks need to be completed to connect your Shopgate mobile shop to your Shopware backend:
- You must enter API credentials in your shop's backend.
- You must enter your shop's URL into your Shopgate's admin page.
Get API credentials
- Log in to your Shopgate Admin page.
- Click Integration from the menu bar, then select Install Interface.
- In the drop-down labeled Select system, search for Shopware 4.x and select it.
- A pop-up will open. Look for Customer number, Shop number, API key, and Alias under 2. Configure. These are the API credentials the plugin needs to authenticate at the Shopgate backend. Leave this page open - we will come back to enter the URL

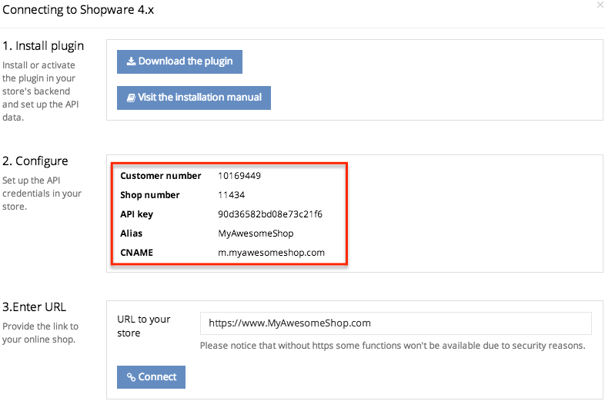
- Copy Customer number, Shop number, API key, and Alias, and paste them individually into the plugin configuration page in your Shopware Admin (Configuration -> Plugin Manager -> Shopgate Extension Settings). The rest of the options can be configured later. Click Save plugin settings.
Connect your shop to Shopgate
- Go back to the pop-up window at your Shopgate merchant page.
- Under 3. Enter URL, enter the URL of your shop, ideally starting with “https://”. For example: https://www.MyAwesomeShop.com. Click Connect to establish the interface.


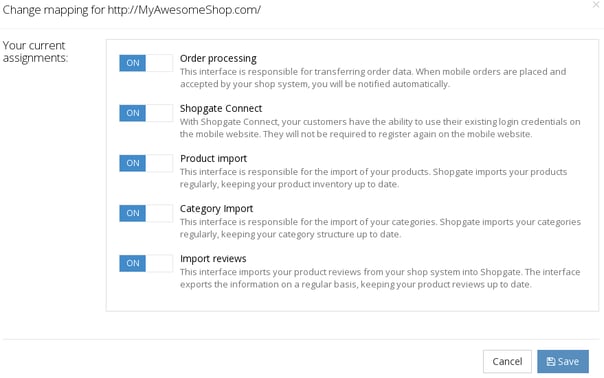
- If a connection is made successfully, the pop-up shown below will open. Here you will be able to assign jobs to your first connection. We recommend leaving all assignments to ON at this time. Click Save.

That's it! Now the Shopgate backend will automatically start to import product data via the newly established interface. Welcome to the mobile world!
Update an existing plugin
Before updating your Shopgate plugin to a newer version, make sure to check if your shop uses a customized version of the Shopgate plugin. If this is the case, a generic plugin update will NOT work for your shop.
You are using a customized version if:
- You have contacted Shopgate for making a third party plugin to work in your mobile shop, or for adding a special feature/function.
- Shopgate has sent you an adapted version of the plugin.
- The plugin file you installed has "adaption" in the name.
Once you know if you are using a customized Shopgate plugin or not, follow the instructions below to update it:
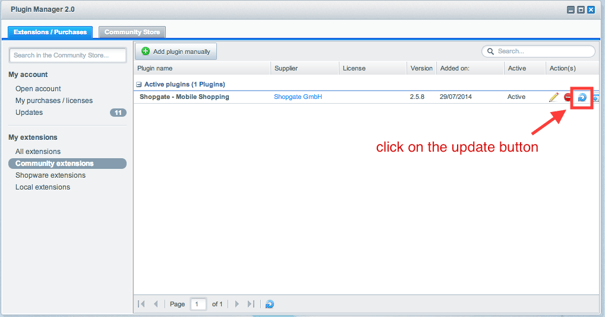
- Download the latest plugin and upload it to your Shopware Admin.
- After a newer version of the plugin is successfully uploaded, a new button will appear in the Action(s) section. Click on it to update the plugin automatically.


- If no update button appears, save your current Shopgate plugin configurations somewhere else, and click Reinstall plugin. Now you need to configure the plugin again with the data you saved before the reinstall.
Please email Shopgate with the following details each time before updating, then follow the instructions above to install it manually.
- To: support@shopgate.com
- Subject: Request an updated Shopgate plugin (custom adaption)
- Email body: Include your shop number and any additional info necessary. Where can I find my shop number?
Configure the Plugin
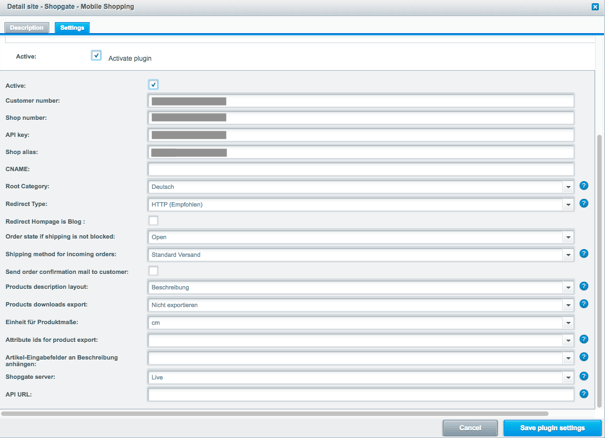
In the configuration panel of your Shopware Admin (Configuration -> Plugin Manager -> Shopgate Extension Settings), you are able to configure the plugin further.

Setting Options Explained
| Active | Select Yes to activate the Shopgate plugin for your shop. |
| Customer number | This is your Shopgate Customer number. |
| Shop number | This is your Shopgate Shop number. |
| API key | This is your Shopgate API Key. |
| Shop alias | This is your Shopgate Alias. |
| CNAME | This is a subdomain of your own domain that points to your mobile website. For example, a CNAME could look like "m.myshop.com". To configure a CNAME, please log on to your server hosting website. For more information, please read our help article Adding a CNAME record in your domain host. |
| Root Category | Choose the root category of your shop. |
| Redirect Type | HTTP redirect is recommended for better performance and search engine rankings. However, using external cache engines (e.g. Varnish) might cause problems such as a "redirect loop." In that case, use JavaScript redirect instead. |
| Redirect Homepage is Blog | If checked, it is redirected if your homepage is a blog. |
| Order state if shipping is not blocked | Set order status to Offen if shipping is not blocked. |
| Shipping method for incoming orders | Select a fixed shipping method for Shopgate orders. Will be used in case the imported order shipping method cannot be mapped. |
| Send order confirmation mail to customer | Allow Shopware to send an email notification for each new order imported from Shopgate |
| Products description layout | Choose the field for the product description for the product export. |
| Products downloads export | Choose here how to export downloads of products. |
| Einheit für Produktmaße | Choose here which unit you want to use for product measures. |
| Attribute ids for product export | All attribute ids will be exported in the property section of the product. Example: 3 for attr3 |
| Artikel-Eingabefelder an Beschreibung anhängen | Choose a list of attributes which is additionally attached to the description. |
| Shopgate server | Do not change this setting unless instructed by your Shopgate support personnel. |
| API URL | Do not change this setting unless instructed by your Shopgate support personnel. |
Frequently Asked Questions
Why is "generic payment" displayed instead of SOFORT Überweisung/Paypal/Credit card?
Payment methods that could not be automatically assigned from the Shopgate plugin will be listed as "Generic Payment."
Why couldn't my orders transfer from Shopware to plentyMarkets ERP system?
If you use the plentyMarkets ERP (Enterprise Resource Planning) system in your Shopware Shopping Cart System, it is a known issue that Shopgate orders may not be transferred correctly.
To fix it, please make the following changes to the plentyMarket Connector Module in your Shopware settings:
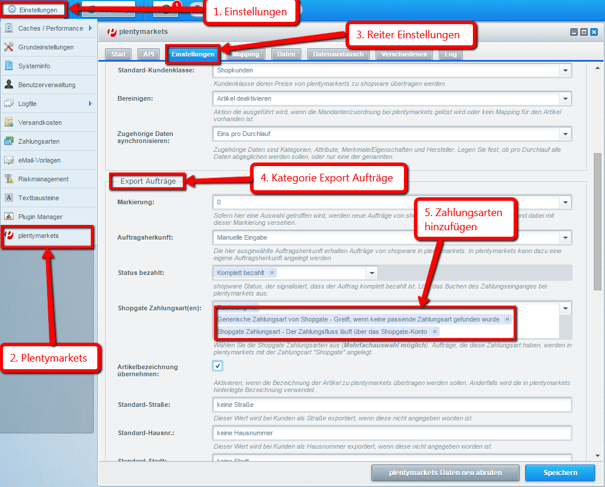
- Navigate to Settings ->plentyMarkets.
- In plentymarket's configuration page, click the Settings tab.
- Look for "Shopgate Zahlungsart(en)" under the section "Export Aufträge."
- In the text field, select "Generische Zahlungsart von Shopgate - Greift, wenn keine passende Zahlungsart gefunden wurde" and "Shopgate Zahlungsart - Der Zahlungsfluss läuft über das Shopgate-Konto."

Why did an order fail to transfer?
This may be caused by the DHL module. If you use the DHL module in your Shopware backend, an error might occur when a customer uses mobile coupons (that is, coupons created in your Shopgate Admin). However, desktop coupons created via your Shopware backend should not cause this issue.
How do I install the Shopgate extension using the zip file?
You can also install the Shopgate extension for Shopware by downloading the zip file called shopgate-shopware-integration.zip via this link then uploading it to your Shopware shop backend:
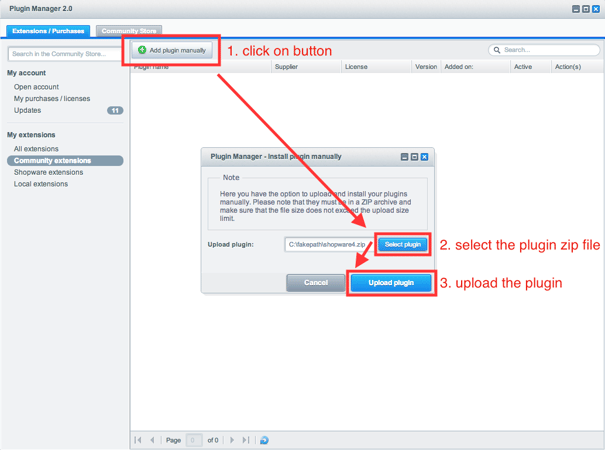
- Log in to your Shopware Admin and navigate to Configuration -> Plugin Manager.


- On your Plugin Manager page, select + Add plugin manually. A new window will appear. Click Select plugin, select the zip file you just downloaded, and click Upload plugin.

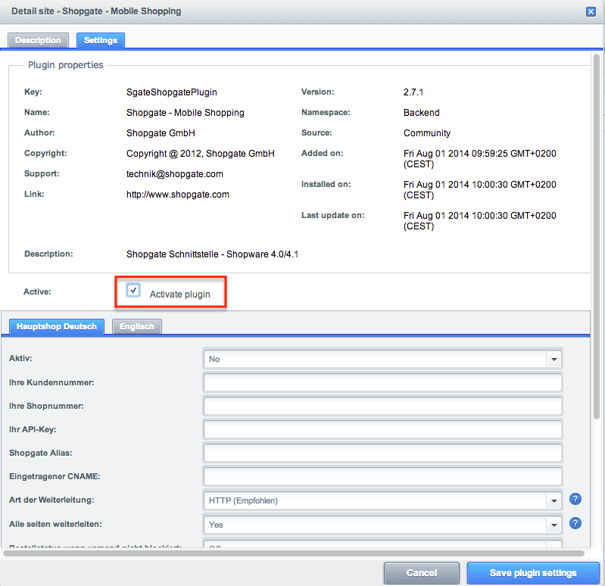
- After the Shopgate plugin has been successfully uploaded, the Shopgate plugin should be listed in the Plugin Manager as inactive. To activate the plugin, click the green + button on the right.

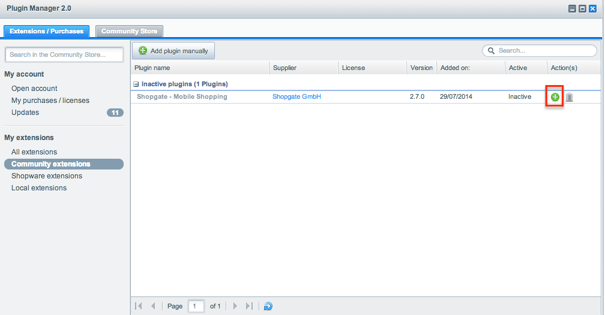
- A configuration section will open. Check the box "Activate plugin" to activate the Shopgate Plugin.

That's it! Now you have installed the Shopgate plugin for your Shopware shop using the zip file.