Overview
With our Notifications module, you can send notifications to your customers via push message and SMS* (*only in conjunction with Omnichannel Suite). You can use notifications to send scheduled marketing campaigns or transaction notifications. An example of this is sending a message to your customers to keep them updated on their order status. The system is completely extensible via APIs.
Notifications consists of two components: Templates & Campaigns.
Templates allow you to prepare the content you want to send, and campaigns allow you to specify when and to which customers the notification should be sent to. Using templates is optional, as you can also define the content of the notification directly when creating a campaign. It is useful to use templates if you want to reuse them for multiple campaigns in the future.
Templates
You can find the templates in your Shopgate backend under Marketing → Templates.
When you open the templates for the first time, you will notice that there are already some templates available. These are the default templates for Push & SMS transactions that are automatically created when you create your store. You can configure these templates and change the content completely to your liking, or delete the templates if you don't want to use them.
You cannot send notifications to customers with templates alone. A template must always be used in conjunction with a campaign.
Creating a new Template
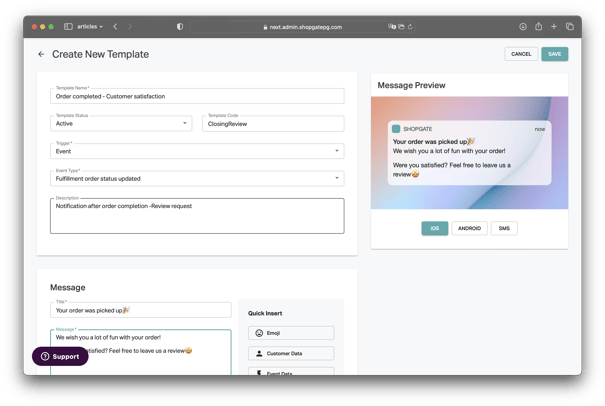
When creating a new Template, you can select a "Trigger" for when this Template should be used.
Use "Schedule/Manual" to send a notification out to a group of customers at a specific Date & Time, or triggered via API. Use the "Event" trigger is for transactional notifications that are being sent out to individual users based on a specific event (e.g. if the order status changed). There are different events that are available for this method.
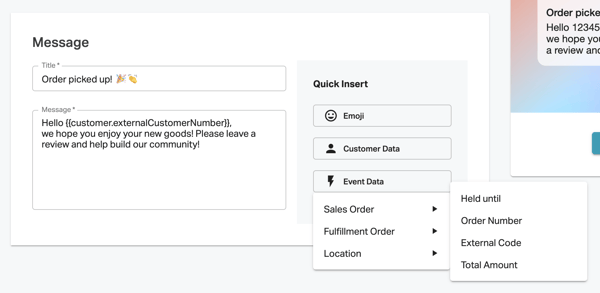
Depending on the selected event and trigger combination there are different variables available to use inside your message. For example, "Schedule/Manual" Templates, you have customer data available (First Name, Last Name etc).
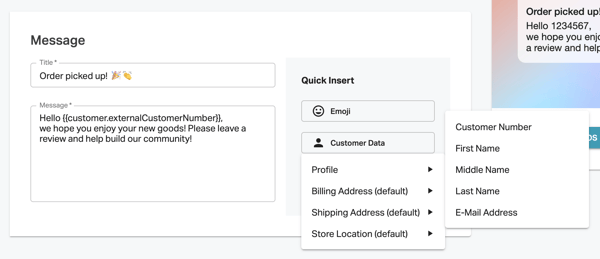
When you select an event, event data is available for use in your message, in addition to customer data variables. The available data depends on the event type, for example, different data is available for "Order added" than for "Fulfillment order updated".
You can configure these fields for a template:
| Field | Description | Example |
| Template Name |
Internal name for the template. Choose a simple description that you can easily find later when configuring campaigns |
Order Completed/Rating |
| Template Code |
Internal identifier for the template. Used, for example, when accessing templates via the API. |
OrderCompleted |
| Template Status |
Active/inactive. Can be used to prepare templates or temporarily disable them. |
Active |
| Trigger |
"Schedule/Manual or Event |
Schedule/Manual |
| Event Type |
Only available if "Event" is selected as trigger |
Order added |
| Description |
Optional. Internal description of the template |
Notification after order completion + rating request |
| Title |
The title of the message that will be sent to the customer. Displayed differently in Push & SMS (see preview). |
Order picked up! 🎉 👏 |
| Message |
The message which will be sent to the customer |
Hello {{customer.firstName}}, we wish you a lot of fun with your order! |
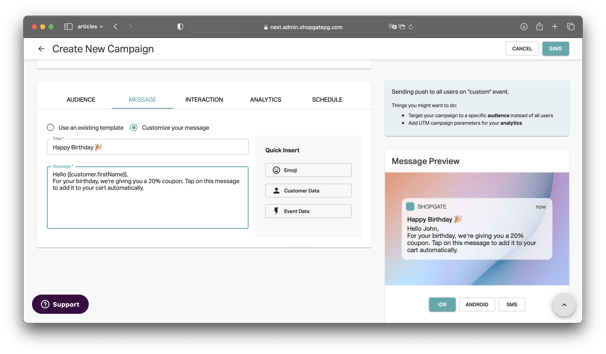
Campaigns
Use campaigns to schedule and send out notifications to your customers.
To do this, go to the Shopgate backend via Marketing → Campaigns.
In the Campaigns overview you can see the list of all campaigns - whether the campaign is currently active/inactive or how many notifications have been sent to customers about campaign.
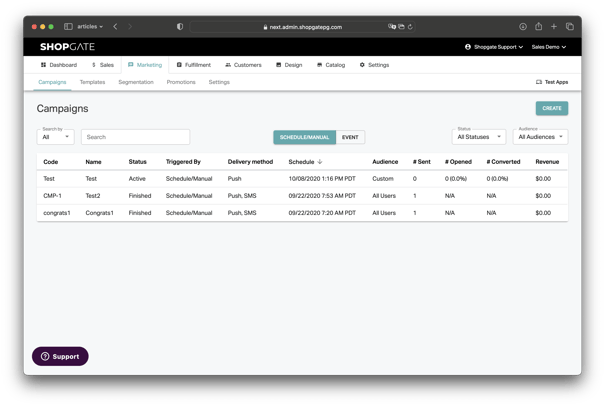
Similar to the templates, when you first open the Campaigns, you will notice that some campaigns are already present. These are the default campaigns for Push & SMS that have been created automatically. You can edit, disable or delete these campaigns at any time if you don't want to use them.
Creating a new Campaign
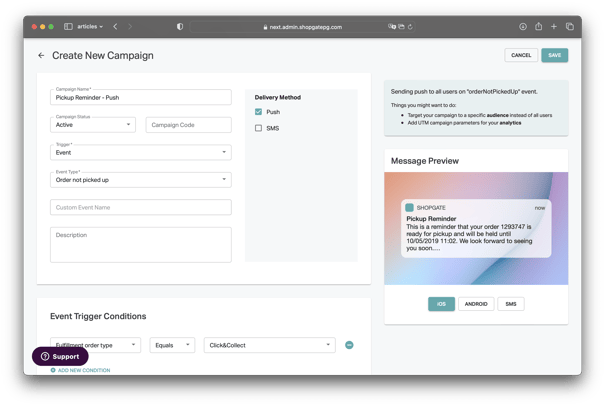
As with templates, when you create a new notification, you must select a "Trigger" which defines when the notification will be sent.
The "Schedule / Manual" trigger is used, for example, for marketing notifications that should be sent to customers at a specific date and time, or if you want to use the Shopgate API to send the notifications.
The "Event" trigger is used for notifications sent to individual users based on a specific event (for example, when the order status has changed). There are several events available.
| Field | Description | Example |
|
Campaign Name |
Internal name of the Campaign | Order completed/Rating request |
| Campaign Code | Internal identifier of the campaign (used used to access the campaign e.g. via the API) |
OrderCompleteReview |
| Campaign Status | Active/Inactive | Active |
| Trigger | "Schedule/Manual" or "Event" trigger | Event |
| Event Type | Only available if "Event" is selected as trigger | Sales order added |
| Description | Optional. Internal description of the campaign |
Push/SMS is sent after the order is completed to trigger rating |
| Delivery Method | Notification sent via Push and/or SMS | SMS |
| Event Trigger Conditions | Only available when "Event" is selected as the trigger. Event trigger conditions allow you to further narrow down when the notification should be sent | Only available if the order status is set to "Accepted" |
| Audience | Select who should receive the notifications. You can select All Users, an Existing Segment, or create a Custom Audience group | All Users |
| Message | You can either select a previously created template or create the message from scratch | Template: Cart Reminder |
| Interaction | Used only for "Push". Defines what should happen when the user opens the push notification. For the "Show other page" interaction, see below for an explanation | App: Open |
| Analytics | Here you can define special parameters that will be passed to your analytics tools | |
| Schedule | For campaigns with the "Schedule/Manual" trigger, you can define the date and time at which the notification should be sent. For campaigns with the "Event" trigger, you can specify optional start and end dates when this campaign is active |
Event Overview
Shopgate provides various standard events that can be used without external integration. The events are partially dependent on the scope of the products used. In addition, there are user-defined events that can be controlled via our API. For example, external marketing tools can be integrated via them. If you have any questions about custom events, please contact support@shopgate.com.
Certain events can be specified more precisely via the so-called "event conditions". For example, individual notifications can be set up per store.
| Event Name | Description/Use Case | Usable With |
| Fulfillment order updated | Change to the order. For example, delete an item or similar. | Fulfillment |
| Fulfillment order status updated | Allows you to send your customers notifications about the order process. For example: reservation is ready for pickup. | Fulfillment |
| Order not picked up | Sent when "customer did not show up" is selected in the In-Store App. | Fulfillment |
| Sales order added | Sends your customers an order confirmation when a new order/reservation is placed. | Fulfillment |
| Schedule pickup reminder time reached | Serves as a pickup reminder for local orders if this feature is enabled. Observes the time configured for the event. | Fulfillment |
| Cart reminder time reached | Reminder for abandoned shopping carts in the app. These are automatically sent to your customers based on the configured time. | Shopping App |
| Inactive device time reached | Sends a message to your customers when they have not opened the app for longer than you configured | Shopping App |
| Sales order fulfillment added | Sends a shipping message when an online order is marked as "Shipped" |
Shopping App, Shopgate native Checkout |
| Custom | In the next step, define the name of the custom event you are addressing through our API |
All, Requires API integration |
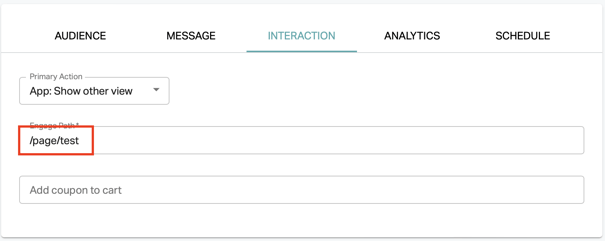
Interaction "App: Show other view"
The interaction "Show other view" can be used to open another page in the app. You only need to know the path to this page in the app. This can be used, for example, to link to a widget page you have created. The app path to open a widget page uses the following format:
/page/url-key-of-page
You can find the URL key for a page in the Shopgate backend. To do this, go to Design → Widgets and select the desired page in the top left corner. At the top right you will see the URL key:
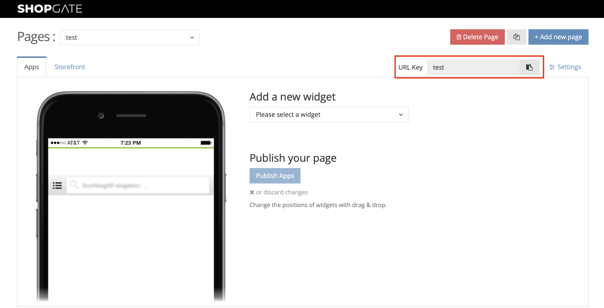
Use this URL key in the "Engage Path" field of the campaign. For CMS pages, "/page/" must be placed in front of it:
Attribution
Which sales are attributed to a push message?
- The message was opened
- Any purchase was made in the same session (maximum 30 minutes of inactivity)
- It is not necessary that the advertised item is purchased
How long are metrics updated for one-time messages?
The status of the message will remain "Active" until there has been no interaction (receipt, opening, purchase) with the message for 10 days.