If you're based in the US and need to update your payment method, please contact Shopgate support.
Shopgate supports PAYONE as a payment service provider.
By setting up your PAYONE account at Shopgate, you will be able to accept the following types of payment from the available marketplace:
| Credit Card, PayPal, Invoice, Direct Debit, Prepayments |
SOFORT Banking | Klarna Invoice, GiroPay | iDEAL | |
| USA | No | No | No | No |
| UK | No | No | No | No |
| Germany | Yes | Yes | Yes | No |
| Austria | No | Yes | No | No |
| Switzerland | No | Yes | No | No |
| Poland | No | No | No | No |
| France | No | No | No | No |
| Netherlands | No | Yes | No | Yes |
In this article, you will find everything you need to set up PAYONE for your mobile website and apps.
Adding PAYONE as a payment provider
Collecting the necessary information
Please prepare the following information before you set up PAYONE as a payment provider at Shopgate.
| Options Provided by PAYONE: | |
| Merchant ID |
These credentials can be found in your PAYONE account credentials. |
| Portal ID / Portal Key | |
| Account ID | |
| Options Defined by You: | |
| Request Method | How do you want to request your payments? Choose between "Pre-authorization" and "Authorization." This option is not available for Prepayment. |
| Additional Settings | To set up additional charges or discounts. |
Setting up PAYONE at Shopgate
To set up PAYONE as a payment provider, please complete the following steps:
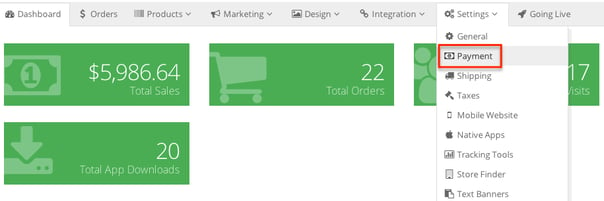
- Log in to your Shopgate Admin page. Click Settings from the menu bar, then select Payment.
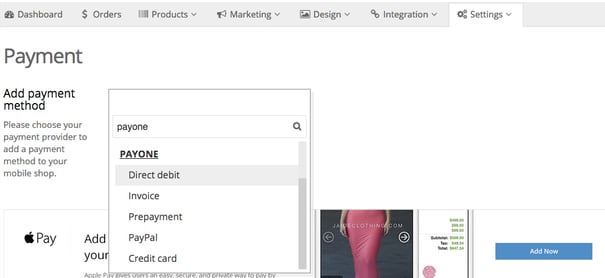
- In the section labeled "Add payment method," start typing "PAYONE", and select the type of payment you accept from the list. If you accept more than one type of payment, repeat the steps until all have been added.
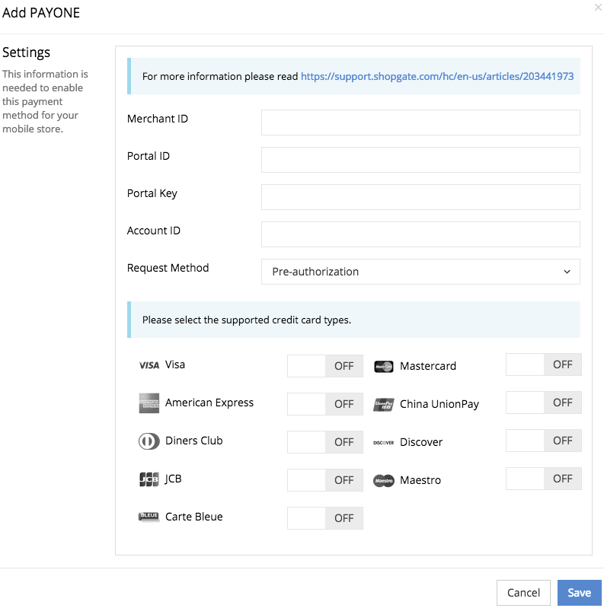
- In the pop-up window, enter your PAYONE information. Click Save. Your account information will be verified.

Now you have successfully set up PAYONE as a payment provider for your shop. Please continue to enter shipping destinations.
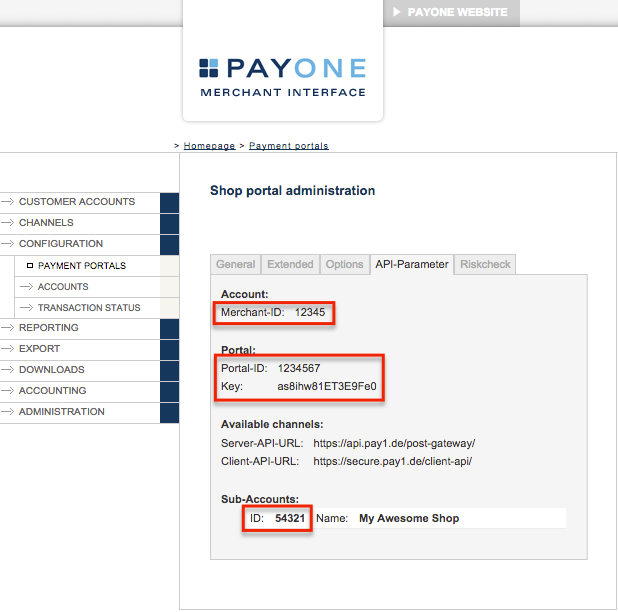
Finding the required information
Your PAYONE account credentials can be found by following the steps here:
|
  |
Entering shipping destinations
PAYONE needs to know which countries your shop ships to. In order to provide this information, follow the steps here:
- On your Shopgate Admin homepage, click Settings from the menu bar, then select Shipping.

- On the Shipping page, click + Add a rate and select all countries that you deliver to in the section labeled "Delivery countries." If you have already configured your shipping methods, click Edit to add delivery countries. Click Save.
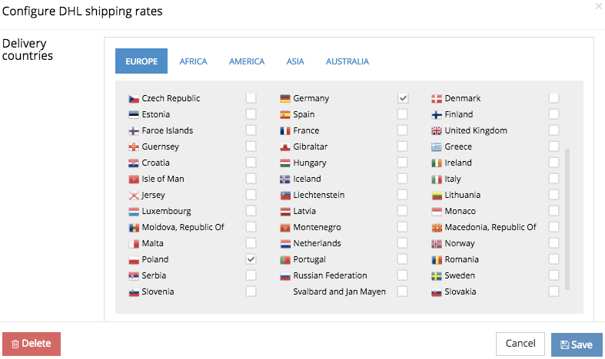

Now you have successfully set up your shipping destinations. Please continue to enter the Shopgate API link in your PAYONE account.
Entering Transaction URL (direct debit, invoice, prepayment)
This step is only necessary if you accept any of these payment types:
- direct debit
- invoice payments
- prepayment
To enter the Shopgate Transaction URL in your PAYONE account, follow the steps here:
- Log on to PAYONE and navigate to Configuration > Payment Portals. Locate the portal you want to use, and click Edit.

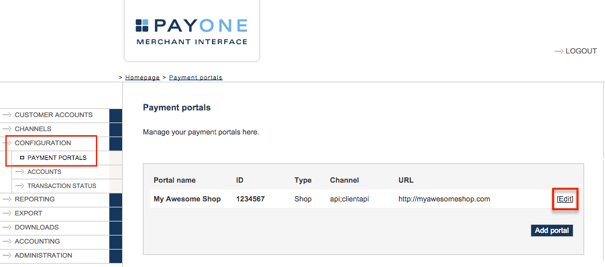
- On the portal admin page, navigate to the tab labeled "Extended" and enter this Shopgate API link in the text field titled "TransactionStatus URL": https://api.shopgate.com/payment/payone


Adding extra fields (iDEAL, SOFORT, Giropay, Klarna Invoice)
This step is only necessary if you accept any of these payment types:
- iDEAL
- SOFORT
- Giropay
- Klarna Invoice
Your PAYONE system requires additional information for iDEAL, SOFORT, Giropay, and Klarna Invoice payments. Please contact Shopgate support at support@shopgate.com to add the respective fields described below.
iDEAL
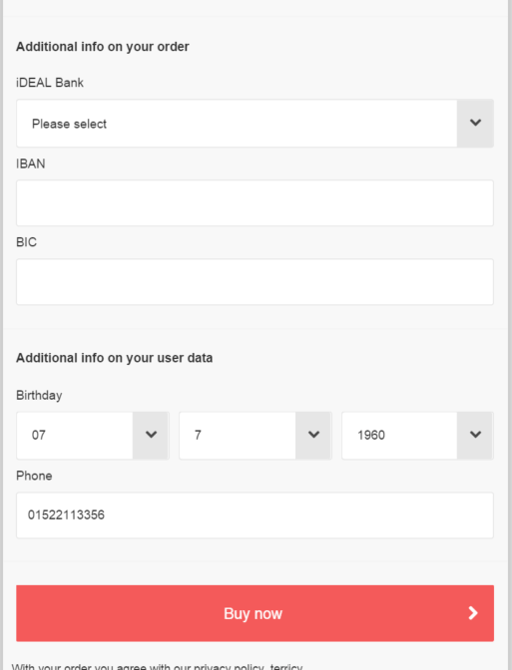
Your customer's iDEAL Bank information is required for all iDEAL orders. Please ask your Shopgate support expert to add an extra field for entering bank information at checkout with these settings:
Field For Customer's Ideal Bank |
|
| Label | iDEAL Bank |
| Internal Field Name | ideal_bank |
| Form Element Type | Dropdown |
| Options(JSON) | { "ABN_AMRO_BANK" : "ABN Amro", "RABOBANK" : "Rabobank", "FRIESLAND_BANK" : "Friesland Bank", "ASN_BANK" : "ASN Bank", "SNS_BANK" : "SNS Bank", "TRIODOS_BANK" : "Triodos", "SNS_REGIO_BANK" : "SNS Regio Bank", "ING_BANK" : "ING", "KNAB_BANK" : "Knab Bank", "VAN_LANSCHOT_BANKIERS" : "van Lanschot Bank" } |
| Validationrules(JSON) | {"required":{"rule":"notEmpty","allowEmpty":true}} |
| Belongs to | Order / Checkout |
SOFORT and Giropay
Your customer's IBAN and BIC are required for all SOFORT and Giropay orders. Please ask your Shopgate support expert to add 2 extra fields for entering customer's IBAN and BIC at checkout, respectively, with these settings:
Field For IBAN |
|
| Label | IBAN |
| Internal Field Name | iban |
| Form Element Type | Input |
| Validationrules(JSON) | {"minLength":{"rule":["userDefined","CustomValidation","minLength","16"],"allowEmpty":true}} |
| Belongs to | Order / Checkout |
Field For BIC |
|
| Label | BIC |
| Internal Field Name | bic |
| Form Element Type | Input |
| Validationrules(JSON) | {"minLength":{"rule":["userDefined","CustomValidation","minLength","8"],"allowEmpty":true}} |
| Belongs to | Order / Checkout |
Klarna Invoice
Your customer's birthday and phone number are required for all Klarna Invoice orders. Please ask your Shopgate support expert to add 2 extra fields for entering customer's birthday and phone number at checkout, respectively, with these settings:
Field For customer's phone number |
|
| Label | Phone |
| Internal Field Name | phone |
| Form Element Type | Input |
| Validationrules(JSON) | {"minLength":{"rule":["userDefined","CustomValidation","minLength","7"],"allowEmpty":true}} |
| Belongs to | User |
Field For customer's birthday |
||
| Option 1 | Label | Birthday |
| Internal Field Name | birthday | |
| Form Element Type | Date | |
| Validationrules(JSON) | {"formattedDate":{"rule":["userDefined","CustomValidation","formattedDate"],"allowEmpty":true}} | |
| Belongs to | User | |
| Option 2 |
Add a mandatory birthday field to the registration form
|
|
Note that you only need to add the field(s) you need. If all fields mentioned in this chapter have been added, this section will appear at checkout:

Frequently Asked Questions
Why couldn't I get payments from my mobile orders?
This is likely because the Transaction URL is not set up correctly.
I already have a TransactionStatus URL. Where should I enter the Shopgate URL?
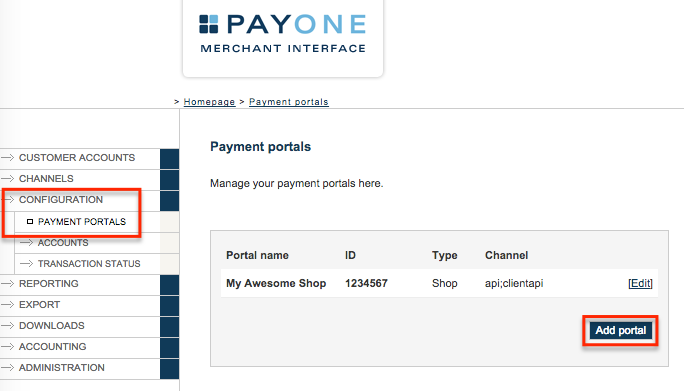
If a TransactionStatus URL for your desktop shop is already entered here, and you are accepting direct debit, invoice payments, and/or prepayment via PAYONE, please create a new payment portal for the Shopgate TransactionStatus URL:
|
1. Navigate to Configuration > Payment Portals and click Add portal.
|


Do I need to refund my customers manually after I cancel an order?
No, you don't need to refund the money manually via your PAYONE account. The refund is done automatically when you cancel an order.