| Available for the following platforms: | |||
| Shopgate Connect | ✔ | Shopgate Go | ✔ |
Shopgate supports Magento as a shopping cart system.![]()
![]()
By setting up Shopgate plugin in your Magento shop, you will get the following features straight into your app and mobile website:
| Supported Version | Import to Magento | ||
| 1.4 + | Orders | ✔ | |
| Sync | Export to Shopgate Mobile Shop | ||
| Delivery Status "Shipped" Order Status "Canceled" Stock Quantity on Product Detail Page Product Tax Classes, Rates, & Rules |
✔ ✔ ✔ ✔ |
Products Categories Reviews Related Products, Upsell, & Cross-sell |
✔ ✔ ✔ ✔ |
| Customer Account | Validate, upon Cart Changes | ||
| Login with Desktop Shop Account Login to Desktop Shop with Mobile Account Customer Groups/Tier Pricing Show Desktop Orders on Mobile |
✔ ✔ ✔ / ✔ ✔ |
Coupon Shipping Method Payment Method Product Availability |
✔ ✔ ✔ ✔ |
| Supported Payments | Other Supported Features | ||
|
Magento native: 1. Added support for Magento version 1.4.0.0 |
|
||
In this article, you will find everything you need to set up the Shopgate plugin for your Magento shop.
Build your mobile shop
Building your Magento mobile shop with Shopgate is simple and fast!
Get your Magento ready
Get your Magento backend ready by following the instructions in the table below. This will prevent your website from becoming temporarily unavailable.
| Before installing or updating the Shopgate plugin |
✓ Disable Magento compilation, if enabled. |
| After installing or updating the Shopgate plugin. |
✓ Enable Magento compilation. |
Install the Shopgate plugin
The Shopgate plugin for Magento can be installed in Magento versions starting from 1.4.0.0. To install the Shopgate plugin, follow the steps here:
- Log into your Magento Admin Panel. Get your Magento backend ready by disabling cache and compiling process. This will prevent your shop from being temporarily unavailable to your customers.
- Navigate to System → Magento Connect → Magento Connect Manager.
- Download the latest Shopgate plugin at shopgate-magento-integration.tgz and upload it manually by clicking Choose File, then Upload.
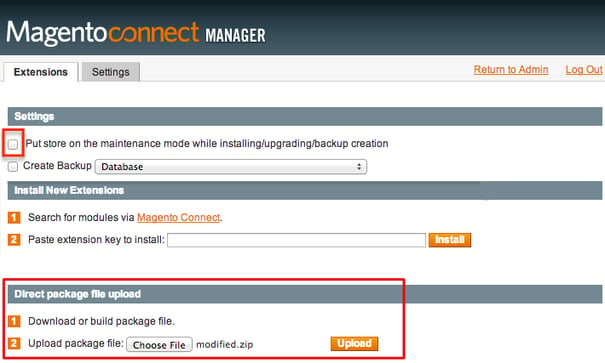
Important: When installing or updating your plugin, make sure to uncheck the option "Put store on the maintenance mode while installing/upgrading/backup creation" to avoid any downtime in your desktop shop. - Scroll down to the bottom of the page, and wait for the log output to show "Procedure completed" text. Click Refresh to finish the installation process
- Flush internal cache and all external cache immediately. You can enable your Magento compiler now if used.
The Shopgate plugin is successfully installed. Now you can import products to your mobile shop.
Import products to your mobile shop
After the Shopgate plugin has been installed, you are only a few clicks away from having a functional mobile shop! Follow the easy steps below to get started.
- First, log into your Shopgate Admin page.
- Come back to your Magento Admin Panel. You should now see Shopgate listed as a new menu entry. Navigate to Shopgate → Manage Connections to set up the plugin.
IMPORTANT: If you experience any issue loading the plugin page, try logging out and logging in again. - If you don't already have a connection created to Shopgate, you will be asked to Establish a new Connection to Shopgate. Choose your default Store View, and click on button Connect to Shopgate.
- You will now be redirected to "Authorization Request" at Shopgate. Leave all options to ON to access all the features listed. Select a mobile shop if you have more than one shop at Shopgate. Click Authorize.
If you're seeing an error instead, read An error occurred at "Authorization request". What should I do? - After a few seconds, you should see a big green Hooray! page. Click Configure interface to continue.
That's it! An import will start immediately and the progress bar will be running. This means that the Shopgate backend is automatically filling your mobile shop with your products! Once the progress bar disappears, you should have your mobile website finished.
Review your mobile shop
You have done everything you need to build your mobile shop! You can preview your apps and mobile website as soon as the import process is finished.
Verify your products, play with your designs, explore the tools and features, and set your shop live!
Understand plugin configurations
In this chapter, we will explain all the options you have to configure the Shopgate plugin in your Magento backend.
To locate the Shopgate plugin configurations, follow the steps here:
- Log into your Magento Admin Panel, and navigate to Shopgate → Manage Connections. If you experience any issue loading the plugin page, try logging out and logging in again.
- You should see at least one connection to Shopgate. Navigate to Action → Configure on the corresponding grid row.
- You will be directed to the Configuration page for the Shopgate module. If you have installed the Shopgate plugin and imported your products, some information should already be pre-filled for you.
Choose your default store, enable the Shopgate plugin, and establish a connection.


| Default Store | This is the default store for the website scope you are in. This is the store that will be the default for imports and other vital checks. |
| Enable | A simple toggle to activate or deactivate the whole plugin. |
| Shopgate Link | Click on the button to establish connection. If this step has been completed, you will see a "connection successful" message. |
The following options are available to Shopgate plugin versions below 2.9.16
| Customer Number | Your Customer Number at Shopgate. Where can I find my Shopgate Customer Number? |
| Shop Number | Your Shop Number at Shopgate. Where can I find my Shopgate Shop Number? |
| API Key | Your API Key generated at Shopgate. This key is used in the authentication process between Shopgate and the Magento module. Where can I find my Shopgate API Key? |
This section offers settings to influence redirecting from your shop to mobile devices through Shopgate.

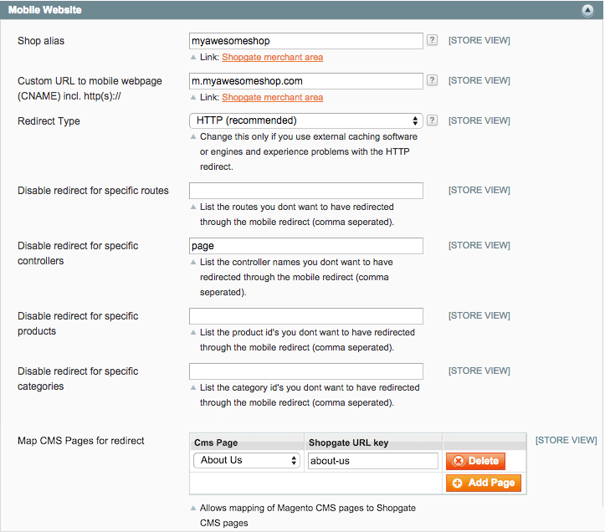
| Shop alias | A descriptive name for the shop. |
| Custom URL to mobile web page (CNAME) | A URL used for the mobile version of your shop. The default is [alias].shopgate.com, so an alternative could be m.[alias].com |
| Redirect Type | This option defines how URL requests to your shop are redirected to mobile devices. There are two options available: you can redirect through HTTP or through JavaScript. HTTP is preferable because it is more descriptive of why it is redirecting and is therefore more SEO friendly. |
| Disable redirect for specific routes | If you want to suppress the mobile redirect for a specific route, you can enter the routes name here in a comma separated list and the route won’t trigger a mobile redirect. For example, if you want your home page and other CMS pages to be routed to the mobile URL, you can write "cms" in this field. |
| Disable redirect for specific controllers | This is the equivalent to suppressing routes, except this is for controllers. (For example, if you want to suppress the newsletter controller for the subscriber page, you can type "subscriber" into this field and it will prevent the redirect on newsletter/subscriber/requests.) |
| Disable redirect for specific products | In this field you can put a comma-separated list of product IDs. For every product ID provided, it will suppress the redirect action to mobile shop on that product's page. |
| Disable redirect for specific categories | In this field you can put a comma-separated list of category IDs. For every category ID provided, it will suppress the redirect action to mobile shop on that category's page. |
| Map CMS Pages for redirect | This feature allows mapping a Magento CMS page to a CMS page created in your Shopgate Admin. Provide the URL key used by the CMS page in Shopgate. |
Here you can define how to export products.

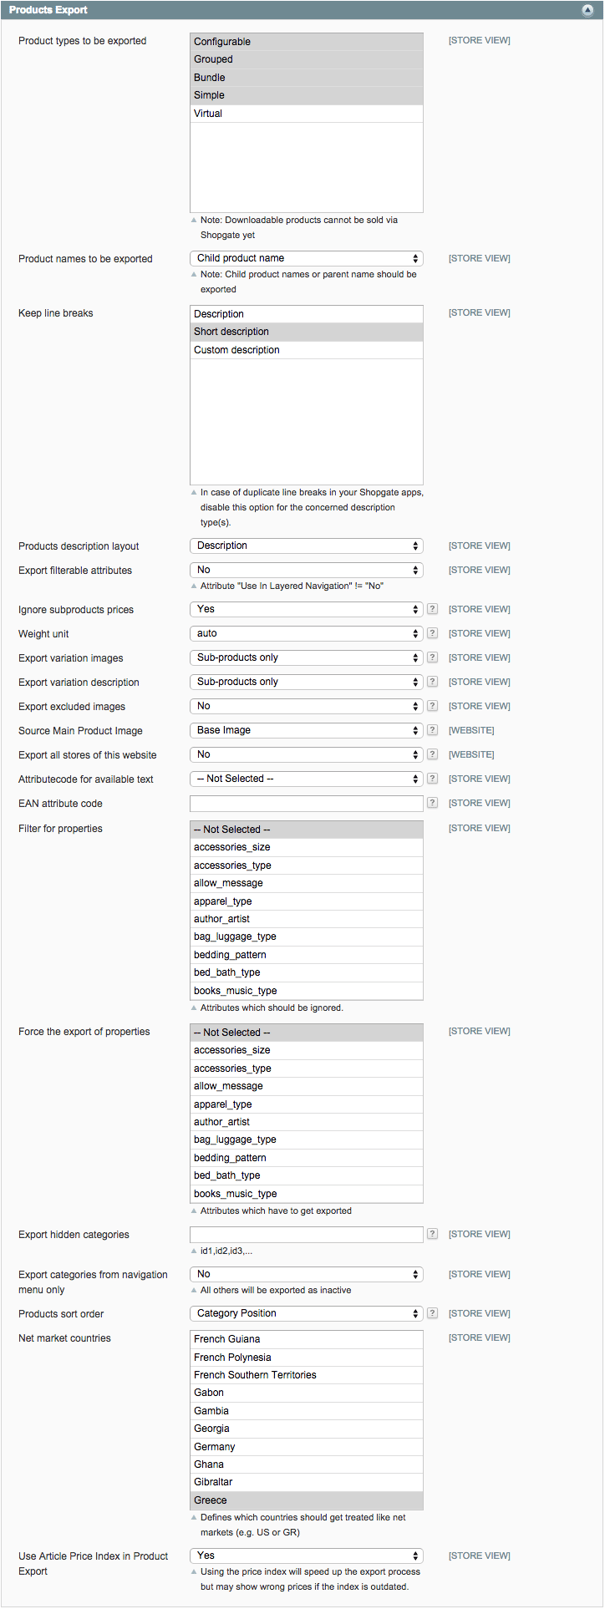
| Product types to be exported | A multi-select drop-down for all product types that we support exporting. Note that product type "virtual" and other custom types are not supported at this time. |
| Product names to be exported | Defines which product name to use when exporting products that have a parent/child relationship. For example, if you select the parent’s name, then all children of a specific product will have the name of its parent. |
| Keep line breaks | This is a converter of line breaks (when you hit “enter” in the description text fields) to HTML break tags (<br />). Depending on how you maintain your descriptions, you may or may not want to select these. |
| Products description layout | The attribute to use when displaying a description on the product page. You can also use a custom attribute if you provide the proper attribute code. |
| Export filterable attributes | The Shopgate module exports any attribute that is visible on the product’s detail page. In addition, you can let the module export any filterable attribute that is visible in the layered navigation. |
| Ignore sub-products prices | Defines what prices will be fetched on products with a parent-child relation. |
| Weight unit | Determine the used weight unit in your shop or let the module figure it out based on the configured default country. |
| Export variation images | Allows exporting images of parent products and children products. You can also choose the order they will be exported in and therefore displayed in. For example, choosing "Both (sub-products first)” will show sub-product images first and then parent images on product pages. |
| Export variation description | Allows exporting descriptions of parent products and children products. You can also choose the order they will be exported in and therefore displayed. For example, choosing "Both (parents first)” will show the parent description followed by the sub-product description on product pages. |
| Export excluded images | If Yes, the pictures that are marked as “excluded” in Magento will get exported. Pictures must be 150x150 pixels or more for this to happen. |
| Export images with low resolution | Allow exports of images that are below 150x150 in pixel resolution. |
| Source Main Product Image | Choose which image will be the main image showing up in category view and as the first image on the product detail page. |
| Export all stores of this website | If No, only data from the default store selected previously will be exported. Otherwise, all products and categories of all stores within this website scope will be exported. |
| Attribute-code for available text | If left unselected, the default "out of stock/in stock" text will be used. A backorder label will also be used if enabled within the default Magento configuration. However, you can use a different attribute to provide the “in-stock”-like notification to the customer. |
| EAN attribute code | Here you can specify an attribute code that is used as the EAN field. |
| UPC attribute code | Here you can specify an attribute code that is used as the UPC field. |
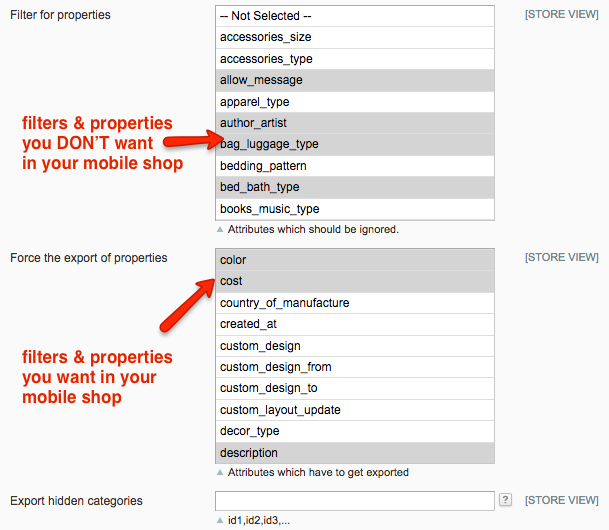
| Filter for properties | Attributes you don’t want to be exported to your mobile shop. |
| Force the export of properties | Attributes you want to be exported to your mobile shop. You can only force to export attributes from the attribute set the product is based on. (Attributes will also only appear on the product edit page in the Magento backend if they are connected to the attribute set). |
| Export hidden categories | This field can contain a comma-separated list of category IDs which will be forced to be exported and set as active in the mobile shop. |
| Export categories from navigation menu only | If set to Yes, only categories that were marked to be included in Navigation Menu will be exported. You can find this setting under the Manage Categories > General Information tab. |
| Products sort order | Setting for sort order of products inside of categories |
| Net market countries | This field is used to set a shop as “net" market. The website stores will get treated like a "net" market and will export product prices as “net." Moreover, the tax handling is different for these stores. This feature should be touched only in rare cases by Shopgate integration managers. |
| Use Article Price Index in Product Export | Use price index to speed up your product import. However, make sure to keep the index up-to-date for the update prices to be displayed on mobile. This is a setting under Index Management > Product Prices. |
This section handles order import processes.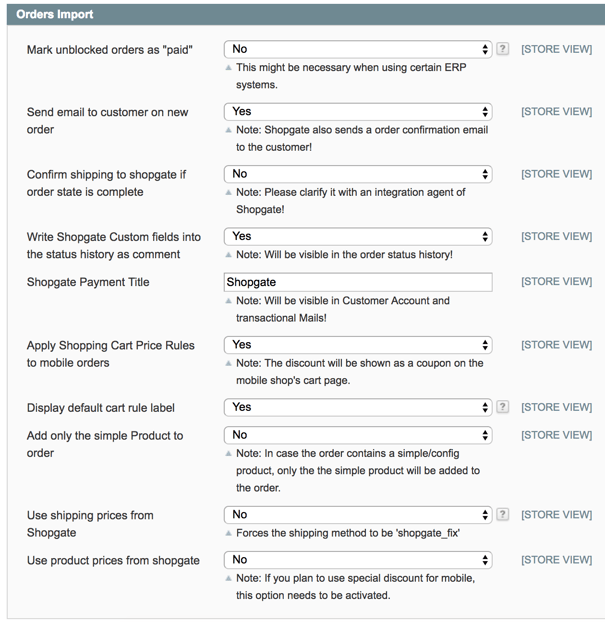
| Mark unblocked orders as “paid” | An unblocked order is the one whose shipment is not blocked. If set to Yes, whenever an unblocked order is imported, the module can capture the order total amount and set the order state to processing. This is very useful for payment providers which have a separate gateway to process the payment since there is no need to verify order payment on import (e.g. PayPal, Klarna, a credit card). |
| Send an email to customer on new order | On each order import, the customer will get an order confirmation mail after import. This flag should be used in conjunction with the "send confirmation mail" flag in the Shopgate merchant area. |
| Confirm shipping to Shopgate if order state is complete | If set to Yes, the plugin will communicate that the shipping is approved and complete to the shopgate merchant panel when a Magento order state becomes "complete." |
| Write Shopgate Custom fields into the status history as a comment | When enabled, your custom fields at Shopgate will be added to the status history comment section on every order import. |
| Shopgate Payment Title | This text field allows the merchant to define a payment title for any payment handled by Shopgate. This payment title is used in emails and order details. |
| Apply Shopping Cart Price Rules to mobile orders | This allows the customer to enable Shopping Cart Rules on mobile site's cart page. |
| Display default cart rule label | If set to Yes, your cart rule label will be displayed to customers at Shopgate checkout. If set to No, “Discount” will be displayed. Cart rules that have an associated coupon code will always display the coupon code. Note: This option does not appear unless "Apply Shopping Cart Price Rules to mobile orders" above is set to Yes (enabled). |
| Add only the simple Product to order | When enabled, only simple products will be added to an order at import. Configurable products and other types of products will be ignored. |
| Use shipping prices from Shopgate | Forces the shipping method to be 'shopgate_fix' and therefore rewrites calculated shipping prices with Shopgate’s shipping price. |
| Use product prices from Shopgate | Activate this option to set special discounted price for your mobile website and apps. |
This tab is responsible for the routing to the Shopgate’s merchant API.


| Shopgate server | This option allows picking a predefined URL to communicate with the merchant API of Shopgate. |
| API URL | This field is used only when the Shopgate server flag is set to custom and is only useful for debugging purposes. |
| .htaccess user | .htaccess user and password are only used to bypass additional htaccess authentications. |
| .htaccess password |
This configuration is under System > Configuration > Sales > Payment Methods. The sections allow configuring order statuses of imported orders.

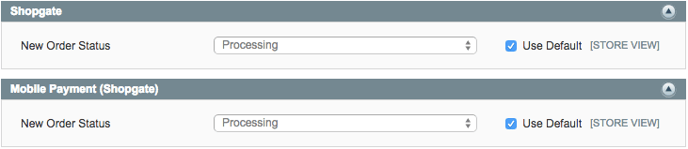
| Shopgate > New order Status | This field allows configuration of the status of new orders which are set to be processed by Shopgate within the Merchant admin panel. |
| Mobile Payment (Shopgate) > New Order Status | This field is the default fallback of all new order imports that have no payment mapping defined in Magento. For example, if we do not support a particular payment module this will be the status used for the order import. |
Update an existing plugin
Before updating your Shopgate plugin to a newer version, make sure to check if your shop uses a customized version of the Shopgate plugin. If this is the case, a generic plugin update will NOT work for your shop.
You are using a customized version if:
- You have contacted Shopgate for making a third party plugin to work in your mobile shop, or for adding a special feature/function.
- Shopgate has sent you an adapted version of plugin.
- The plugin file you installed has "adaption" in the name.
Once you know if you are using a customized Shopgate plugin or not, follow the instructions below to update it:
- Log into your Magento Admin Panel. Get your Magento backend ready by disabling cache and compiling process. This will prevent your shop from being temporarily unavailable to your customers.
- Navigate to System → Magento Connect → Magento Connect Manager.
- Download the latest Shopgate plugin at shopgate-magento-integration.tgz and upload it manually by clicking Choose File, then Upload.
Important: When installing or updating your plugin, make sure to uncheck the option "Put store on the maintenance mode while installing/upgrading/backup creation" to avoid any downtime in your desktop shop.
- Once again, you will see the log output running through update commands at the bottom of the page. If the plugin is updated successfully, you should see the log output with text reading "Procedure completed" at the bottom. Click the Refresh button to finish the update process.
- Flush the internal cache and all external caches immediately. You can enable your compiler now if used.
Please email Shopgate with the following details each time before updating:
- To: support@shopgate.com
- Subject: Request an updated Shopgate plugin (custom adaption)
- Email body: Include your shop number and any additional info necessary. Where can I find my shop number?
Once you receive the email, install the latest plugin manually.
That's it! Now your plugin has been successfully updated.
Frequently Asked Questions
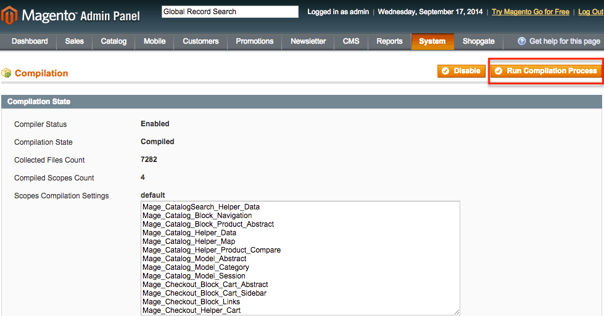
How do I disable/enable the compiler in Magento?
Navigate to the page System → Tools → Compilation.

How do I disable or flush the internal cache in Magento?
Navigate to the page System → Cache Management.


A blank page appeared after I installed the plugin. What should I do?
If you see a blank page after you clicked the Install button for Shopgate plugin, it is possible that the compiler in your Magento backend was running at the time. Don't panic! Simply follow the steps below to revert the issue:
- Go back to your Magento Connect Manager by clicking the back arrow on your browser. If this is not possible, type "your-magento-shop-name.com/downloader" in your browser's address field.
- Now you should be back to your Magento Connect Manager page. Uninstall the Shopgate plugin.
- After the log output shows a success message, click on the Refresh button to reload the page. Now your Magento should work again.
- Now build your mobile shop.
An error occurred at "Authorization request." What should I do?
If an error message appeared on the "Authorization request" screen, check if your shop's URL is entered correctly.
If the error still occurs, try to connect the Shopgate plugin manually using the instructions below.
How do I connect the Shopgate plugin manually?
- Log in to your Shopgate Admin and navigate to Integration → Install Interface.
- In the drop-down labeled "Select system," start typing "Magento" and select the version you use.
- A pop-up will open. Select Version before 1st July 2014 and enter your shop's URL. Do NOT click Connect yet.
- Copy the Customer number, Shop number, API key, Alias, and CNAME (if applicable) in the pop-up above and paste them into your Magento backend (System → Config → Shopgate). Click Save.
- Go back to your Shopgate Admin page, and click Connect.
That's it! Now you have successfully installed and connected your Shopgate plugin manually.
How do I show or hide filters and properties in a mobile shop?
Filters and properties of your products can be shown or hidden in your mobile shop. To do so, go to the Shopgate plugin Configuration page in your Magento backend. Find the section Products Export, and look for options "Filter for properties" and "Force the export of properties."
- Filters and properties selected (highlighted) in "Filter for properties" will be hidden in your mobile shop.
- Filters and properties selected (highlighted) in "Force the export of properties" will be shown in your mobile shop.

How do I stop showing the "plugin update" notification at start-up?
Starting from Shopgate plugin version 2.9.7, we will inform you of an update in your Magento backend. A notification will show when you log in to your Magento. If you don't want to see this notification each time you log in to your Magento, follow the steps below:
- In your Magento Admin Panel, go to System → Notifications.
- Find the notification that you want to stop showing, and click Mark as Read in the Actions column.
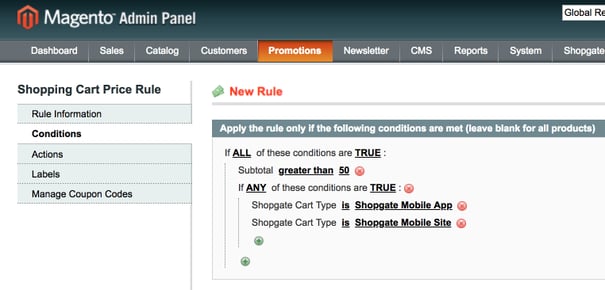
Where can I find the "Shopgate Rules" for Shopping Cart Price Rule and how do I set this up?
You can find the Shopgate Rules under Promotions → Shopping Cart Price Rules → Conditions.
Currently, you can choose the Cart Type from the Shopgate Mobile Site and the Shopgate Mobile App. 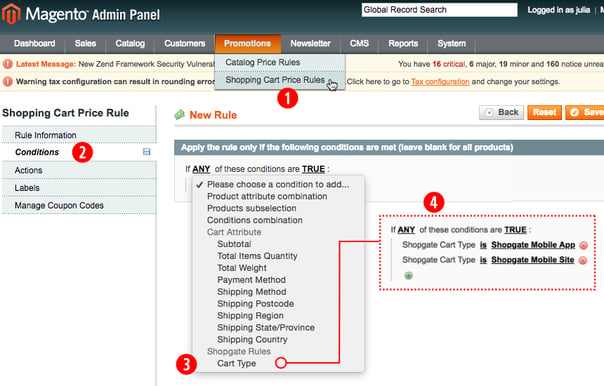
You also have the option of adding additional conditions. For example, if you want to give your customers a discount for carts with $50.00 and up, simply create a "nested" price rule for each cart type.
Here's how it works: Add a new rule and go to conditions. Choose the attributes ALL and TRUE so that the new rule takes effect if all your selected conditions are true. In our example, the shopping cart attribute "Subtotal greater than 50" would have to be added as a condition (see screenshot below).
Depending on this, only the cart types have to be added. Since the new rule is to apply to all types, please select a Conditions combination with the attributes ANY and TRUE as an additional condition. Then all cart types must be added (Shopgate Mobile App and Shopgate Mobile Site). The new rule will become effective as soon as the subtotal is greater than $50.00 and one of the selected cart types is used. The screenshot below illustrates the entire process.