JTL Software is available as a shopping cart system at Shopgate.


By setting up a connection in your JTL shop to Shopgate, you will get these features straight into your mobile shop and apps:
|
Support Version |
3 |
Import to JTL Software Orders |
✔ |
|
Customer Account Login with Desktop Shop Account |
✔ |
Export to Shopgate Mobile Shop Products |
✔ |
|
Sync Delivery Status "Shipped" |
✔ |
Validate, upon Cart Changes Coupon |
✔ |
|
Payments Supported JTL uses its own logic for payment mapping. |
Notes
|
||
In this article, you will find everything you need to set up a connection to Shopgate for your JTL shop.
Install the Shopgate Plugin
- On your FTP server, go to the root directory of your shop. Copy the entire directories of "includes", "shopgate_library", and "shopgate_request". (In your root directory, you should also see these folders: admin, bilder, and classes.)
- Find the plugin "Shopgate Plugin (AGI Plugin)" in Pluginverwaltung of your shop and install it.
- Enter "test" as your license key. This will give you a 14-day free trial. After 14 days, you will need a license key to use the plugin. For more information on this topic, please contact our external developer Andreas Guder here.
- After the Shopgate Plugin has been installed, please continue to set it up by following the instructions below.
Configure the Plugin
Before the Plugins can function properly, a few components need to be configured.
Find API credentials
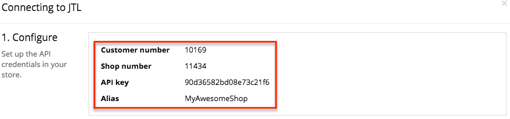
- Log in to your Shopgate Admin and navigate to Integration → Install Interface.
- In the drop-down labeled "Select a system," type JTL, and select it.
- A pop-up will open. Copy your Customer number, Shop number, API key, and Alias to a text editor - you will need to enter them into your JTL shop backend. Leave this page open. We will come back to enter an URL for importing products.
Enter the credentials
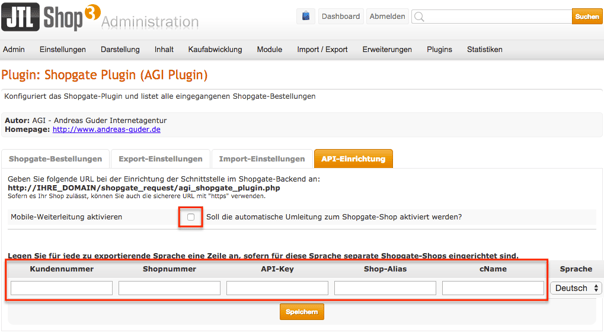
- Log in to your JTL shop Admin and navigate to Plugins → Plugins → Shopgate Plugin (AGI Plugin).
- Switch to the tab API-Einrichtung to give the following folders "write permission" over your FTP program or web interface. Repeat the step until the error "not writable" disappears from all directories.
- shopgate_library/temp/
- shopgate_library/temp/cache/
- shopgate_library/temp/logs/
- shopgate_library/config/
- Enter your Shopgate Customer number, Shop number, API key, and Alias copied from the previous chapter. Uncheck the option "activate mobile redirect" for now - this option needs to be completed later. Click Speichern to save.
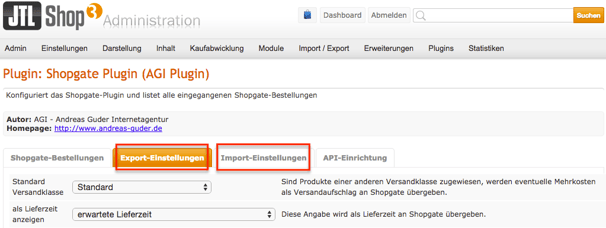
Edit settings for import and export
Navigate to Export-Einstellungen and Import-Einstellungen to set up import and export options.
In Import-Einstellungen, you can configure your payments. To do so, follow the instructions for mapping payment methods.
Establish connections
- Go back to the page you left open when you found your API credentials.
- In the pop-up window under 2. Enter URL, enter a URL for importing products from your shop and click Connect. This URL for importing products should look like this:
https://myawesomeshop.com/shopgate_request/agi_shopgate_plugin.php
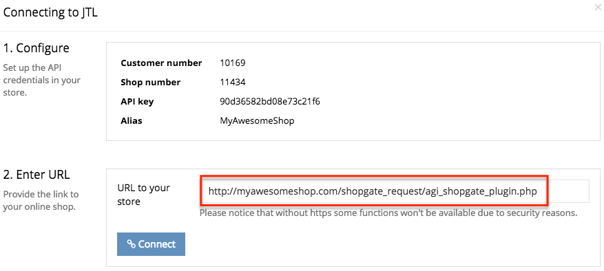
- When the connection is made successfully, a pop-up like this will open. Leave all assignments to ON and click Save.
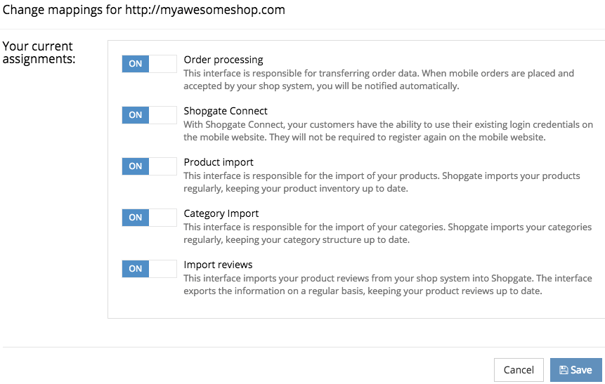
Congratulations! You have successfully created a Shopgate mobile shop. Once import finishes (that is, once the progress bar disappears), you should be able to see your mobile shop filled with products. Welcome to the mobile world!
Activate mobile redirect
To redirect mobile visitors to your mobile website, follow the steps here:
- In your JTL Shop 3 Admin backend, navigate here: Plugins → Plugins → Shopgate Plugin (AGI Plugin).
- On the plugin page, click on the tab labeled "API settings" and check the option activate mobile redirect.
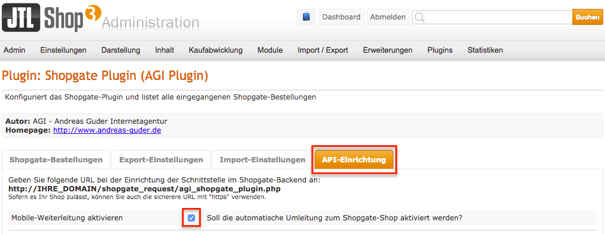
Now your mobile website will be successfully forwarded.
Map payment methods
On the page labeled Import-Einstellungen, you will see all the payment methods that are supported at Shopgate. Those that are supported at your JTL shop are listed in the drop-down.
To map payment methods, look for the ones that are used in your Shopgate mobile shop and select a corresponding payment from the dropdown list.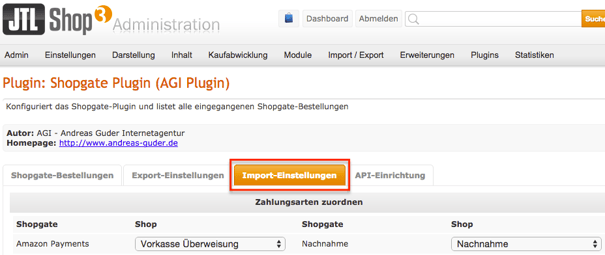
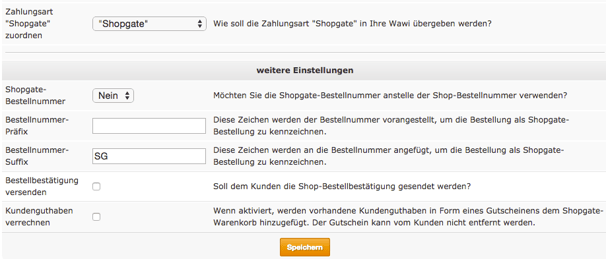
- If you use Shopgate payment methods, select "Shopgate" for section Zahlungsart "Shopgate" zuordnen. Configure additional settings if necessary. Click Save.
Now you have successfully mapped your payment methods.
If you have finished all tasks described above, you have successfully set up everything you need for your JTL mobile shop with Shopgate. Now simply sit back and watch your business grow!