

Getting started
Before you set up AppsFlyer with Shopgate, have the following information ready:
| Account Info | Description |
| AppsFlyer Dev Key | You can find this key in your AppsFlyer account. |
| Revenue (type) |
Choose whether AppsFlyer should track your revenue as a "gross" or "net" amount. |
If you do not have an AppsFlyer account yet, just get in touch with Shopgate directly.
Setting up AppsFlyer
To connect AppsFlyer to Shopgate as a tracking service provider, follow these steps:
- Log in to your Shopgate Admin.
- In the menu, open Settings › Tracking .
- There, go to the AppsFlyer function and activate it. A new pop-up window then opens.
- Enter your AppsFlyer Dev Key and select your revenue type. Save your details.
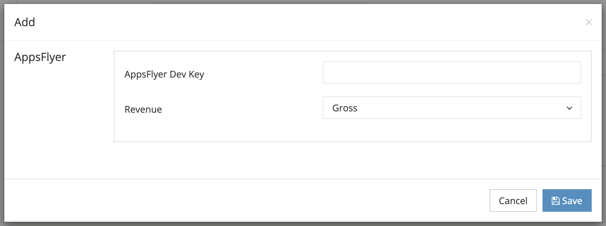
That's it! AppsFlyer has now been set up successfully for your mobile app.
Frequently Asked Questions
Where can I find my AppsFlyer Dev Key?
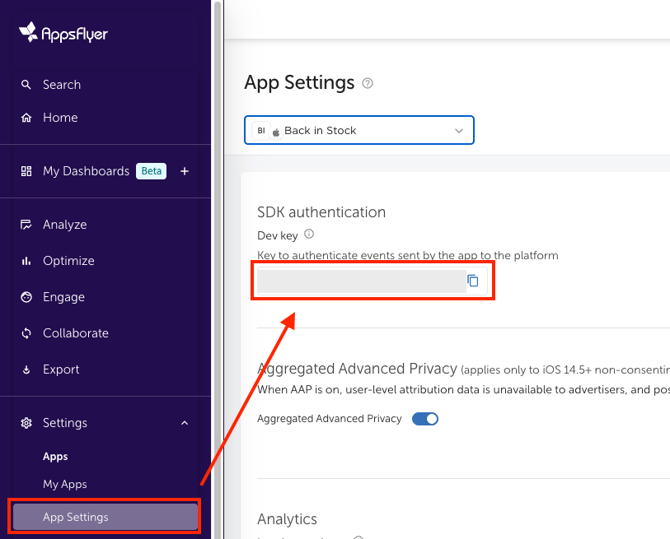
To find your AppsFlyer Dev Key, simply follow these steps:
- Log in to your AppsFlyer account and first add your app using these instructions
- Then, under "Settings > App Settings", select the app you want to track.
Your Dev Key is shown in the SDK Authentication section.
Can I track my iOS app separately from my Android app?
Yes! Your AppsFlyer account shows the data from your iOS and Android apps separately. You do not need to configure anything for this – Shopgate technology takes care of it automatically.
Can I test the integration?
Yes! First add the relevant test devices in AppsFlyer under "SDK > Test Devices". You can then see events from your selected device under "SDK > SDK Integration Tests > Live Events". Important: To send events, tracking must be allowed on your device ("Statistics" consent + iOS tracking consent)