| Verfügbar für folgende Plattformen: | |||
| Shopgate Connect | ✔ | Shopgate Go | ✔ |
Google Tag Manager for mobile apps allows you to send your app data to multiple tracking tools. This allows for increased user experience and enhanced data gathering all while avoiding having any complicated development effort. To implement this enhanced reporting yourself, Google Tag Manager for mobile apps does require Firebase Analytics.
Step 1: Set up Google Tag Manager for mobile apps
- Create a Google Tag Manager account.
- Note: If you already have a Google Tag Manager account, you can continue to use it and proceed directly to the next step.
- Set up an iOS and an Android container.
- Publish your container. You can already create tags, but it is recommended to first complete the configuration at Shopgate.
Step 2: How to connect your Google Tag Manager containers with your Shopgate apps
- Next in your Shopgate Admin, go to "Settings" => "Tracking Tools".
- Upload the Android and iOS containers in the "Google Tag Manager Configuration" item.
- IMPORTANT: Please do not change the filename - if the filename has been adjusted automatically during download (for example with the suffix "(1)"), then remove it before uploading.
- Shopgate recompiles your app and uploads it to the app stores.
Step 3: Setting up tags, variables, and triggers on Shopgate
Once your Google Tag Manager container is published to your Shopgate app, you can create and customize tags at any time without having to recompile or publish your app.
Depending on to which tracker you want to connect through Google Tag Manager, the setup of Google Tag Manager differs. Here's a list of events, variables, and triggers that Shopgate automatically submits to your Google Tag Manager integration via Firebase for Mobile Apps:
Firebase for Mobile Apps: Event reference for Shopgate Apps
Step 4: Test Your Google Tag Manager Tags:
You cannot test your tags until your container is first compiled into the app and published to AppStore or PlayStore. After publishing for the first time, you can test and publish your tags without the need for another update.
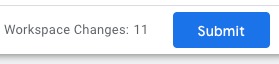
- In Google Tag Manager, locate the “submit” button in the top right corner of the page. This button allows you to save your changes.
- Select "Create Version".
- Recommended: Describe the changes you want to test in "Version Name" and "Version Description" and be as thorough as you can for future reference.
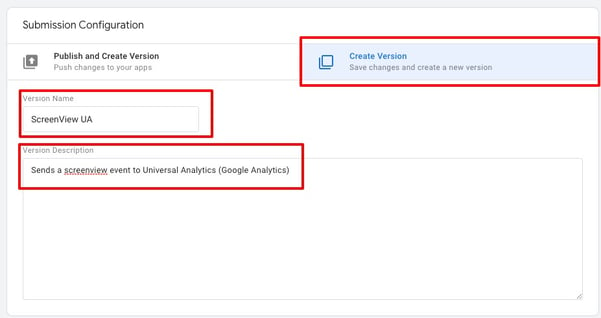
- Recommended: Describe the changes you want to test in "Version Name" and "Version Description" and be as thorough as you can for future reference.
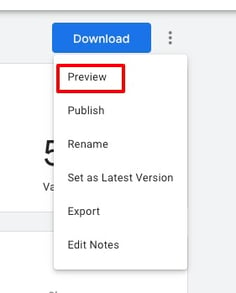
- After saving, select the three dots behind "Download"

- Select "Preview"
- Create a preview QR code that you scan on your smartphone with a QR code reader or your iPhone camera to put your app in preview mode. The smartphone you scan the code with needs to have your app installed with the Google Tag Manager container compiled.

1: Enter your Application ID. You can find this in your Shopgate merchant admin under "Settings" => "Tracking Tools" => App Info Button
2: Press "Generate begin preview link"
3: Select a device on which you have installed your app that already contains Google Tag Manager. Scan the QR code you generated in step 2 with this device. The app will open and a success message will be displayed. All events that you now generate from this app now trigger the tags for which you have created the preview link.